Showing posts with label flowers. Show all posts

17/01/2016

Traveling Art Journal

Back in September 2015 Ayala Art (aka Martha) hosted another traveling art journal circle where a group of artists would send their journal around the world from one artist to another and each artist would make art in the journal according to the theme requested by the artist.  This time we have 11 artists in the group from the USA, UK, Australia and New Zealand.

Here are some pics of the art I have made.

My attempt at Frida Khalo for Ayala


My page in my journal - my theme is black/white and a dash of red


Woodland Girl

06/09/2015

Day 6 - 29 Faces Art Challenge Sept 2015

Day 6 flowers in my hair.  Some say she looks sad.  I think she looks thoughtful, maybe dreaming of another place and time. 


Find out more about the 29 faces challenge here. 

21/01/2015

What's On Your Work Desk? Wednesday #294

Hello to another WOYWW and time to nosey on over to Julia's blog the Stamping Ground to see what's on everyone's work desk.  You'll also find details of how you can join in the fun.  I like a bit of a nosey around don't you?

I'm afraid I have nothing to show on my desk this Wednesday.  This is how I left it before going off to the gym.  So here are the remains of the items I'd been using to make some inspirational cards for my gym buddy.  Packs of gems, my glue sticks, bottles of paint and a selection of rubber stamps which still need to be cleaned up - yeah I know I should do them straight away but hey I was on a roll.  I'm liking how my clean off paper is looking - that will go towards a new background to a canvas or something.


Here are the 2 inspirational postcards I made for Angela (my gym buddy).


Happy Wednesday 
Anita

Oh and just a reminder and apology for the 'NOT A ROBOT' check instead of word verification you can ignore it.  It can't be removed unless you have a Google account which I do but have no idea how to remove it.

05/01/2015

Day 4 & 5 or 30 Paintings in 30 Days January 2015

I didn't get time to make anything for day 4 as we had visitors and by the time they went it was late and it had gone dark.  Therefore I made 2 paintings today.  Well one is a mixed media painting in my altered book and the other is a study of an eye in watercolours - Daler Rowney pan set.  One of my goals for 2015 is to master pan and tube watercolours.

Mixed media painting in my altered book

Watercolour eye study

There's a whole host of artists taking part in this challenge from all over the globe check them out here on the Slices of Life blog.

19/11/2014

What's On Your Work Desk Wednesday #285

Goodness I can't believe I haven't blogged since last week - time flies when you're busy having fun creating new items to sell.   Time for WOYWW again and this week on my desk is the finished painting I've made for Flood the Streets with Art  and the usual mish mash of coloured pencils, acrylic paints, brushes and a very dirty jar of water.

Want to know what WOYWW is all about then pop on over to the Stamping Ground where the lovely Julia will explain all.


The finished painting

This is how it would look framed  I'll be leaving it unmounted/framed and let the finder decide what or how they want to display it.

Well I'm off to visit some desks and see what other artists are sharing.
Thank you to everyone who visits mine and takes the time to leave a comment it really is appreciated.

Anita

12/11/2014

What's On Your Work Desk? Wednesday 284

Here we go again with another look at WOYWW - want to know more and how to participate?  Then pop over to the Stamping Ground where Julia will explain all.

My desk this morning consists of a painting I'm trying to finish for the Flood the Street with Art project - find out more about that and how you can take part on the face book page.  This is how I left it last night after adding black outlines around the flowers and painting the cogs green in the center of each flower - they were stenciled in using texture paste.  To the left there is a female figure cut out and painted in black which is now made up into an altered clothes pin (made this morning while my computer had a hissy fit).  Sitting on the handle of the pots at the back you can see the two dress altered clothes pins I made yesterday.


The finished clothes pin "Don't forget me"

That's it from me I'm off to see what everyone has on their desks
Anita

06/11/2014

Art Every Day Month - November Day 6

No I didn't miss a day I just posted on the facebook group yesterday as I'd already had a post up for WOYWW (what's on your work desk Wednesday).

One of my Gelli art prints 

Today I've made some progress on the canvas I'm making for Flood The Street with Art, I've added some texture with stencils and a light texture paste, I've also added some stencil elements with acrylic paint.  A canvas which I'm prepping with colour and I found a page in my altered book where I'd cleaned off my brushes of excess paint and found that there were a couple of shape so I've started to outline them and fill in the spaces for facial features.  I may just have them so they indicate a face - we'll see.

Pages in my altered book - can you see the 3 images on the right hand side page?

Canvas being prepped but not sure what I'll be doing on it yet.

Painting for Flood the streets with Art - texture paste and stencils.  I've also changed the colour of the flowers and lightened the background.

Have fun and if you'd like to join in with Art Every Day Month or Flood the streets with Art then please do pop over and have a look at the details.

Enjoy your evening 
Anita

02/11/2014

Create Art Every Day November Day 2

So it's day 2 of the create art every day challenge hosted by Leah over at Creative Every Day .  

I've worked a little bit more on the painting I started yesterday for Flood the Street with Art project.  I'm at the messy untidy stage where everything looks flat and has no texture or interesting sections.  I haven't planned this one in how it should look when finished I'm going to let it develop on it's own.  

The messy untidy stage day 2

From Day 1 the start of the painting

Anita

01/11/2014

Create Art Every Day November Day 1

New month, new challenge.  November's challenge is to create art everyday - check out the details here on the Create Every Day blog.  I did this challenge back in May of this year and found it a little difficult to create something new everyday.  So for this months challenge I have decided to work on one piece of art which will eventually be left in a public space to be picked up and taken to a new home as part of "FLOOD the streets with ART".  The day of abandoning the art work is 28th November or as it's known in the USA as Black Friday.  There are nearly 4000 participants from all over the world.

So this is what I have started today and hope to work on everyday and have it finished for the 28th.  It will be a mixed media piece.  The colours aren't quite right as it's more pink than orange but that will probably change as I work on it.  It measures 12 x 9 inches.  


Anita

25/10/2014

Oyster Stamp Blog Hop Winner

WOW just look at all the goodies that popped through my door today.  I took part in a blog hop - visiting listed blogs - over a few days looking at what the selected artists had created within a theme.  The blog hop started off at Hickydorums and went on daily with different blog hosts.  The idea was to visit each blog and leave a comment.  Well being nosy and I like to see what's happening in the arty world of crafts I entered and left a comment on each of the blog posts.  When I first read the blog hop details I don't think I even saw that there was a prize I was too excited to see the different techniques and idea.  Anyway last week Neet from Hickydorums announced a winner and I was one of them.  

Here's what I received today from Oyster Stamps who were offering the prize - there's some stamps (which a certain 9 year old has hinted that she likes), a couple of packets of air dry clay which I've never tried, a couple of tubs of Brusho (to add to my collection), some molds etc.

My Happy Post. 

Well I'm off to watch Strictly Come Dancing - tomorrow is play day with my goodies.
Anita
#blogtoberfest14 day 25

24/10/2014

More Gelli Print Cards

Running late today as its the Hindu new year (2071) and we've had visitors and this is going to be a very short post.  

So here are the last of my cards made with the Gelli prints I made this week.  This time I've added some bottle caps along with the rubber stamping. 

Rubber stamped flowers with a flower head stamped and inserted into a bottle cap. 

These I've left as abstract pieces.


On this one I stamped 3 images in black ink and then added the bottle caps with the stamped image of the flower heads in a blue/green colour.

Anita
#blogtoberfest14 Day 24


23/10/2014

Gelli Print Cards - #blogtoberfest14 day 23

So I've been having fun with the Gelli Arts printing plate and I've now got quite a few pieces of prints.  Now it's great pulling all these prints but what to do with them?  Well the possibilities are endless you can use them as part of your mixed media artwork, or add them to your journal pages, make paper beads with them etc.  Here I've made mine into very simple cards with a little bit of rubber stamping added to them -apart from the first card in the row of 3 which I've doodled on to creating an abstract face and fish.  

I can't take credit for this simple yet effect design.  I was blog hopping last week and I came across Shabby Cottage Studio run by the lovely Gail Schmidt and she has kindly allowed me to use her design idea to create my cards.  Please do pop over and have a look at Gail's blog and her cards as they are really lovely, she's also created matching envelopes how clever is that?


Anita


17/10/2014

Another Gelli Print- Dark over Light

Yesterday Gelli Arts released a tutorial for printing dark over light and it involved letting the paint dry before adding the final layer of black.  I'm loving playing with the gelli plate but I don't like rushing and pulling the print while the paint is still wet as I find you can't control the design as much as I'd like to.  The other thing I like about this new technique is that you can really build the design in stages and maybe a little bit more refined - maybe I just like being in control.

Anyway here is what I did this evening.  It's not very detailed as I didn't have much time but I did enjoy the process and next time I'll give myself more time to plan out the design.

Ha yes I do have a messy desk and not so much space to work in but I like it like that.  
Anita 

#blogtoberfest14 day 17

13/10/2014

Gelli Prints

Day #13 of #blogtoberfest14 

Gelli printing is the rage at the moment with the endless possibilities of creating unique one off background prints.  You can cut them up, to use in your art work, journaling pages, bookmarks, gift tags the list is endless. I used a mix of rubber stamps, cut out stencil block shapes, the owl greeting card which I bought from Paperchase and a cocktail stick. My paint of choice was Liquitex acrylic paints.

The top 2 prints are made on glossy photo paper and the larger pieces below are made on copy paper.


More about #blogtoberfest14 can be found over on Shells in the Bush

Anita


21/09/2014

TAg YoU'rE IT Tutorial- Handmade Monday

Hello everyone hope you've had a wonderful weekend. The weather has been kind to us here in the UK and it stayed dry for the Walk of Hope stroll around Tatton Park yesterday for The Christie Hospital -you can see a pic here

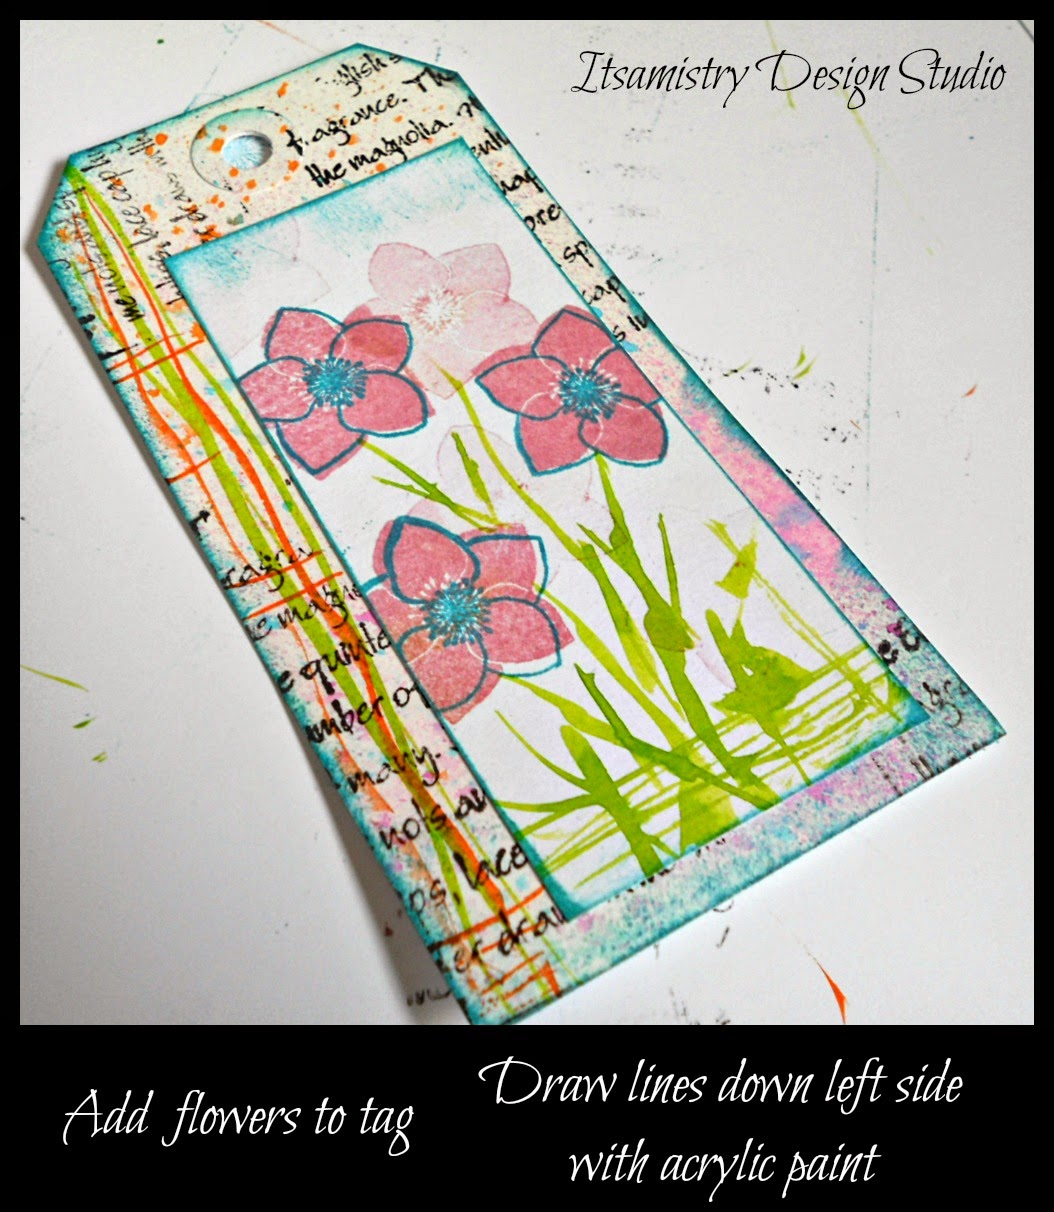
Today I've been playing with some floral stamps from Oak House Studio.  The stamp is part of the Big Christmas collection and is proving to be one of my favourites - there is a positive and negative so great for creating different textures.  All the products I've used in this tutorial are available from Oak House Studio (ribbon and gems are from my stash).

I've made a step by step tutorial if you fancy having a go at making these tags. 

So here goes - 

1.  Gather all your ingredients.  


2. Apply spray inks in your colour choice - I've used citrus orange, totally turquoise and regal claret. Randomly stamp the text with black ink and add ink around the edge of the tag with the sea blue ink pad - just run the ink pad directly onto the edge using a gentle stroke.  Put to one side.


3. Cut a piece of card which is smaller than the tag.  Stamp the solid flower using the dusky pink ink pad and then the outline stamp with the sea blue.  You'll notice that there are a few lighter solid flowers - I stamped these after the initial flowers had been stamped and there is usually a little bit of ink still on the stamp (no point wasting the ink right?).  Add a border again using the sea blue ink pad as in the previous step.


4.  Next we need to add the leaves.  Here I've used the Oak House Studios acrylic inks and a nail art brush (which you can get from Poundland yep you read that right :) )  Dipping the brush lightly and making sure you don't have too much ink on the brush all you need to do is gently stroke the brush in the areas where you want grass/stems and leaves.  You don't have to be too neat to do this.


5.  Glue the smaller stamped card onto the tag (on this one I've glued it off center and to the right.  I've added a few lines of acrylic ink along the left side of the tag using peridot and amber inks with the nail art brush.


6.  I finished off the tags with some ribbon and gems which I added to the middle of the flowers.


Here are a couple of cards I made using the same flower stamp.


I hope you've enjoyed the tutorial - You can find the stamps here
and the ink pads, sprays and acrylic inks here  

I'm linking up with the Handmade Harbour for Handmade Monday and Creatives Mondays 

Happy Crafting
Anita

15/06/2014

Catching Up - Photo Heavy

It's been a busy week with lots of new artwork made for trade, to sell and collaborations.  Those of you who have been following me for some time will know my passion for challenges especially if they are art related.  Why do I join these challenges and put myself through the stress of coming up with something that would be acceptable?  Well it's mostly to stretch myself and see if I can make something outside of my comfort zone.

So my latest challenge started last week on Twinkle Twinkle Like A Star (also see my previous post) called Summer of Colour 4.  I came across this on facebook (as you do) and I knew I had to join.  The colour challenge last week was Aqua, Yellow with a dash of Pink.  

The first photograph shows what I did initially but I wasn't happy with it as it just needed 'something'.  The second photograph is the finished piece.  I'm much happier with that version.  I can't wait to see what this weeks colours are going to be. 


1st Version

Finished piece

Finished piece but upside down - I like it this way up or should that be down :)

The other items I made are some Artist Trading Cards for trading in a swap I am hosting at a gallery in Altrincham Manchester UK.  I'm a volunteer there and have been given the grand title of ATC coordinator.  I've found that ATC's are not so widely known in the UK and not something that is known in the art industry - the concept of "trading" art is not understood and 'artists' don't seem to be able to grab the concept.  I think it's a great way of owning an original piece of artwork and the best thing is it is open to everyone and doesn't require lots of expensive tools.

Here are a couple of the ATC's I made this weekend.  The one in the middle I made into a Father's Day card for my dad as they are the perfect size to put onto a card.


And finally I'll leave you with a picture of a canvas I finished this week.  It's not very big and the colour is more minty green than blue/green.  The hearts and 'follow your heart' are both made with air drying clay.


Apologies for the long post but I wanted to do a catch up.  I promise my next post won't be as long.  Hope you've all had a good weekend.

I'm linking this post to Handmade Monday over on Handmade Harbour and Creative Monday's it's been a while since I participated in any blog hops.

11/12/2013

Merry Christmas Mid Week Paper Craft Party Design Team

I wanted to try something a little bit different for today's theme "Merry Christmas".  It's nice to use designs which are specifically made for Christmas but sometimes you just have to challenge yourself so today I want to show you how you can use a design which isn't for Christmas.  

I'm using #217 cute cat with balloons digi stamp.....okay so you're wondering how this can be turned into a Christmas card...right?  Well here goes - I printed the design onto water colour paper and coloured it in with a selection of watercolour pencils (prisma and faber castell).  Next I added white circles randomly over the card with acrylic paint - I used a pen top dipped into the acrylic.  I also used the presents from #189 presents and gifts 10 in 1 painted those with watercolours and added some gems to add texture and I like sparkles on my gifts.  The tree I made from air-drying clay and embossed it with a rubber stamp before cutting it out with a cookie cutter - let dry over night and then painted with acrylic paint and added glitter.  The banner 'Let it Snow' is #226 Christmas Tags and Sentiments.  Oh and the santa hat is done digitally because I forgot to make one before I'd started editing (hope I'm forgiven for that but it looks pretty cool).

I hope you like my idea of using a non Christmas design and making it Christmasy. 


So as you know I added the digital hat to the cat in the above design well I had a play and did this using Picmonkey which is a free online photo editor.  I didn't get time to print it and add colour to the whole design but hopefully it will have given you another option of adding elements to the digi stamps.   

Hope you've enjoyed reading my post today. 
Please pop over and see what the rest of the design team have been making over on Handmade Harbours Midweek Paper Craft Party.

Anita