Showing posts with label acrylics. Show all posts

23/04/2016

Self Portrait - Challenge

Have you ever been thrown out of your comfort zone?  Well that's exactly what happened to me when one of the travelling journals arrived and the theme was self-portraits.  Now those who know me know that I don't do "realistic" work.  It took me a couple of weeks of procrastination and nerves to pick up the journal and just get it done.  I chose a photograph that was taken by Martha from Ayala Art  - Martha came all they way up to San Diego to meet me when I was over there in February.  It was so lovely to actually meet her in person at long last.  

So here is what I did and I'm going to congratulate myself of achieving a not too bad selfie painting (I hope never to do another one too soon haha).

Martha and I in San Diego

Image on the left has been edited from the photo above


The final image.


07/09/2015

Day 7 - 29 Faces Challenge September 2015

I managed to find some time this morning to play with my acrylics and inktense blocks.  Although it's not a complete painting I'm happy with the shading - not perfect but heading in the right direction.

Find out more about the 29 faces challenge here

20/07/2015

Summer Of Colour 5 Week 6

We have come to the end of the Summer of Colour challenge which makes me sad.  The weeks have just flown by and in those weeks I've been lucky enough to have seen many creations by very talented artists.  

I'd like to take this opportunity to thank all the artists who have visited and left comments.  

The final weeks colours are 2 orange and 1 blue.  Here is my last canvas and a collage of all 6 canvases together.


05/11/2014

What's On Your Work Desk? Wednesday - Gelli Art Prints

It's time for some WOYWW - What's on your work desk Wednesday.  You can read all about it here on Julia's blog the Stamping Ground.

This photograph was taken yesterday (Tuesday) and it's still that way now.  I had an afternoon of painting and pulling prints with my gelli plate.  I only have the one size and it just fits neatly into the space where I make stuff hehehe sounds very techie doesn't it?  But you know what I mean.  I have a large desk but only a small space to create in - nice and cosy.  

Anyway what you can see on my desk are the prints I made using the Gelli art plate.  I'm finding it very addictive and have to be strict with the time I spend with it - it's like having a creative relationship haha.  I've used some of the new goodies I bought from hobby craft on Sunday (I'd only popped in for some white envelopes).  

These prints will be used as part of a Christmas card project I am involved in for a company in London and will be part of a blog post - the 12 days of Christmas.  I'm really drawn towards the print on the right hand side of the photograph.  You can just see the colours on the first print and I've purposely hidden the rest of the image as it was the first one I pulled and I really love how it's turned out and will feature in my little project.

Gelli art prints

My goodies from Sundays visit to Hobby Craft
(the envelopes were on the other table).

Right I'm off to grab a cup of tea and heading over to the Stamping Ground to have a nosey around what everyone else has on their work desks.

Anita


04/11/2014

DIY Washi tape - Art Every Day November

I like washi tape and what you can do with it but I wanted to make my own bespoke tape to match my artwork.  There are plenty of tutorials on You Tube with different ways of making it.  I've used masking tape for mine because that is what I had and didn't want to go and buy anything special just in case I didn't like the way it turned out. 

I didn't want to make a whole real of tape I only wanted enough to have a play with and use on a Christmas card I've designed using stamps from Oak House Studio.  I used a non stick liner to attach the tape to this is about the same size as copy paper and is enough to have play with.  I stuck 3 strips of tape down and painted over them using the last 3 colours you can see in the paint pots in the top picture.  I then used the large snowflake which just fits onto the tape but I wasn't too bothered about getting the whole image on the tape as I stamped it randomly along the middle and the edges.  The second tape I stamped with a couple of the snowflakes and the words 'Let it Snow' along the middle and the last tape I used 3 snowflakes.

On a piece of card I drew some triangles in 2 different sizes, painted and stamped the images in the same colours as the tapes.  Once dry I cut the ones I liked the best and glued them to some turquoise card and cut around them leaving a small frame.  To make the triangles look more like trees I added tree trunks using the same turquoise card cut into squares.

I added the trees to cream card stock - the 2 small trees are glued to the card and the large one is attached with 3D foam to give the image some dimension.    
To finish off I added my DIY washi tape 'Let it Snow' below the trees.  


Three steps to make the 'washi' tape

The trees painted and stamped


The finished card.

That's if from me until tomorrow.  Don't forget to pop over to Art Every Day Month to see how everyone is doing with the challenge
Anita

02/11/2014

Create Art Every Day November Day 2

So it's day 2 of the create art every day challenge hosted by Leah over at Creative Every Day .  

I've worked a little bit more on the painting I started yesterday for Flood the Street with Art project.  I'm at the messy untidy stage where everything looks flat and has no texture or interesting sections.  I haven't planned this one in how it should look when finished I'm going to let it develop on it's own.  

The messy untidy stage day 2

From Day 1 the start of the painting

Anita

24/10/2014

More Gelli Print Cards

Running late today as its the Hindu new year (2071) and we've had visitors and this is going to be a very short post.  

So here are the last of my cards made with the Gelli prints I made this week.  This time I've added some bottle caps along with the rubber stamping. 

Rubber stamped flowers with a flower head stamped and inserted into a bottle cap. 

These I've left as abstract pieces.


On this one I stamped 3 images in black ink and then added the bottle caps with the stamped image of the flower heads in a blue/green colour.

Anita
#blogtoberfest14 Day 24


16/10/2014

Diwali Festival of Lights

#blogtoberfest14  day 16 - This time next week most Hindus all over the world will be celebrating Diwali - The Festival of Lights - I say most as not all Hindus celebrate Diwali as I found out when I was working out there a few years ago and depending on which part of India you are from Diwali is celebrated for different reasons.  

In the Gujarat where my family are from, the festival honours Lakshmi, the goddess of wealth - new businesses are also started at this auspicious time.  Diya's or lamps are lit in every household so that the Goddess Lakshmi will find her way to each house to give her blessings.  Another reason to celebrate is the return of Lord Ram and his wife Sita from an exile of 14 years.  You can read more about Diwali here.  

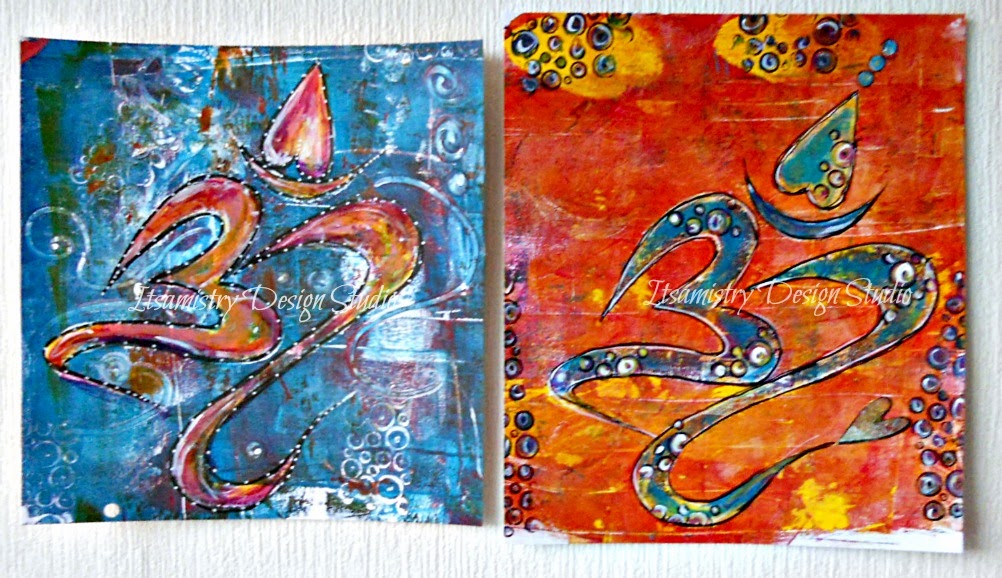
I haven't made any specific cards this year but I think my Gelli print OM designs can be made into cards and are suitable for the occasion.  I know many of the commercial cards depict images of the gods and goddesses and some of my family have mentioned that they would prefer to get something a little bit different.  

These are the original Gelli prints and below are the 2 cards I made by printing onto mat photo paper.


Anita