As 2013 approaches people the social networks have been asking about New Years resolutions. I don't make resolutions instead I make a list of things I want to achieve. It can be anything from reading certain books, going to the movies, theatre etc.
Here is my list - not in any particular order (I'll probably add to this list along the way)
1.Create a vision board
2. Read more business related books and utilise the information from them.
3. Go to the theatre - I love seeing live performances.
4. Read books for pleasure -not done enough of that in 2012
5. Make time for ME - I seem to have worked most of 2012
6. Update my Etsy shop more regularly with all my work
7. Blog more - I seem to have been rather poor at blogging this year.
8. Get out and network and be more pro-active - meet new people- see new places
So what will you be doing in 2013? Please feel free to leave a comment I would love to know what you have planned.
My wish for everyone is to have a healthy and happy 2013 - Happy New Year!!
Anita

Hello and welcome to Itsamistry Design Studio. Here you will find a collection of my creative endeavours.
30/12/2012
12/11/2012
Moo Houses
I created these for trading at www.atcsforall.com. These will be on their way to new homes soon. I'm really pleased how these turned out and I think I will make greetings card with them - well prints of the houses as I won't have the originals. This way I can mix and match them. If I get time I may even make some more and sell the originals.


11/11/2012

15/07/2012
Balanced Heart Project
I seemed to have lost the will to write any blog posts since March. I guess sometimes you just have to leave things alone and not get too stressed. This doesn't mean that I've not been creative. I have carried on with a couple of art projects and handmade card orders.
Jewellery making has been put on hold since April/May after an accident at work which caused an inflamed tendon and using any of my tools is very painful. The ultra-sound hasn't helped so I am now waiting on having a cortisone injection which I am NOT looking forward to as I don't like needles.
Anyway like I said earlier I have been creating artwork and since May I have been involved in a project that has been started by my friend Ang West over on The Balanced Heart Project . Every month myself and 4 other artists create 2 pieces of artwork which incorporates "hearts" as the main feature. The inspiration for this Project, is Ang's little boy, Andrew who passed away on 22nd of October 2001-please pop over to the blog for the full details. My involvement came about after Ang posted on facebook asking for artist to collaborate in a heart project. At the time I didn't know what it was about only that "hearts" were involved and as I have a rather lovely collection of "heart Art" I thought this would be a great way of collecting more original artwork. It was only after hearing Ang's story that I remembered how art and the support from my artist friends had helped me through a very dark time a few years ago and I wanted even more to "help" Ang with her healing. I am honoured to be part of this project and hope that my "hearts" help her in her journey.
Here are the hearts I sent to Ang for May and June.

I hope to be back on a regular basis with more updates of the last few months.
Thank you for visiting and please do leave your comments - they are really appreciated.
Anita
Jewellery making has been put on hold since April/May after an accident at work which caused an inflamed tendon and using any of my tools is very painful. The ultra-sound hasn't helped so I am now waiting on having a cortisone injection which I am NOT looking forward to as I don't like needles.
Anyway like I said earlier I have been creating artwork and since May I have been involved in a project that has been started by my friend Ang West over on The Balanced Heart Project . Every month myself and 4 other artists create 2 pieces of artwork which incorporates "hearts" as the main feature. The inspiration for this Project, is Ang's little boy, Andrew who passed away on 22nd of October 2001-please pop over to the blog for the full details. My involvement came about after Ang posted on facebook asking for artist to collaborate in a heart project. At the time I didn't know what it was about only that "hearts" were involved and as I have a rather lovely collection of "heart Art" I thought this would be a great way of collecting more original artwork. It was only after hearing Ang's story that I remembered how art and the support from my artist friends had helped me through a very dark time a few years ago and I wanted even more to "help" Ang with her healing. I am honoured to be part of this project and hope that my "hearts" help her in her journey.
Here are the hearts I sent to Ang for May and June.
 |
| Hearts for May |
 | |||
| Airdry clay hearts for June |
These are the hearts I have received from Ang -

To see all the hearts that have been created for May and June by all the artist involved please pop on over to The Balanced Heart Project blog. You can also read Ang's full story there.
I hope to be back on a regular basis with more updates of the last few months.
Thank you for visiting and please do leave your comments - they are really appreciated.
Anita
08/03/2012
Wedding Carnival

WEDDING CARNIVAL!!
Being held at the NEW Salford Reds Stadium
Come over and visit an Elite Group of suppliers for a day of fun and inspiration
FREE ENTRY and goodie bags if you register online at -
I look forward to seeing you there.
Anita
20/02/2012
Jewellery Party
Last week has been pretty busy as I prepare for a jewellery party this Thursday. I've made some sparkly earrings with fuchsia pink Swarovski Elements Crystals and a lovely pair with White Opal Crystal Briolettes.
I've also been busy making some more greetings cards which can be adapted to suit any occasion. I like to let the customer choose the card and message. Sometimes you can find the card that you like but the message isn't the one that you want.
I'm pleased to say that the snow has disappeared but it seems to have gone really cold again.
Here are the earrings


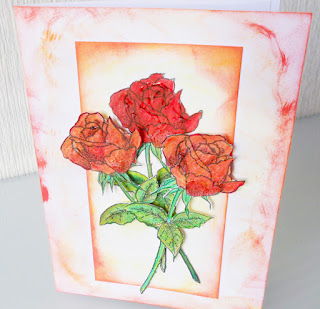
This one is a rubber stamped image which has been painted using Pro-Markers. They are more on the pastel side than my normal brights. I've stamped the ribbon with a small flower stamp. I've added glitter and glossy accents to the card to give it some texture.

This is a single rose stamp. I have cut out 2 of the images and raised them with foam pads to give a 3D effect. I made one a few weeks ago with yellow roses. I thought these would make great Mothers Day cards.

I'd not added the glitter and glossy accents to these when I took the photograph.

If you would like to see more creative work by some very talented artist then pop on over to Wendy's blog at 1stUniqueGifts for her Handmade Monday post.
I would love to hear your thoughts on my work so please leave a message in the comments box.
Have a great week
Anita
12/02/2012
CupCake Greetings Card Tutorial
Well here I am again apologising for the lack of posts. I've not been in the mood to post about anything recently I'm blaming the weather - it's cold, damp and dark and I don't like the cold one little bit.


Anyway, here I am raring to go and post a tutorial on how to make one of my cupcake cards. The stamps are from Kanban - called Fairy Cakes (they don't seem to be on the website - I bought mine from Hobby Craft). I made the card to add to my small collection of greetings cards and posted it on the Kanban facebook page. One of the members asked if I would show how to make the card - which is quite flattering - and because I'm nice and like to share I made up a simple step by step tutorial.
Here goes -
Step 1. Gather your ingredients, Rubber stamps, ink pads, glossy accent, gems, glue, coloured pencils (colouring medium of your choice), smooth water colour paper or card stock and foam pads.
Start by stamping your image onto your card/watercolour paper (300gsm)

Step 2 - Paint your images with your chosen medium. I've used Derwent Inktense watercolour pencils - I added the colour very roughly then blended it all in with a damp (not wet) paintbrush.

Step 3 - Paint your background let dry and then randomly stamp the background. I've used 2 different flower stamps from the Fairy Cake stamp collection. If you don't want to create your own background you can use scrap-book or patterned paper instead.

Step 4 - Before glueing the background to the base card add a line along the edge or mount onto contrasting paper. Once you've glued down the background glue one of the cupcakes to the middle of the card then add foam pads to the remaining cupcakes and place on either side of the centre cake.
With the glossy accents - add a pea sized drop to the cupcakes and smooth over with your finger to give a glazed look. While the glue is still tacky add your gems carefully to the cupcake and the bow.
To finish add glitter to the middle of the background flowers and to the edge of the background.

Here is the finished card -

This is the original card (before it was personalised) -

A different design from the same collection - this time I've added foam pads to the bows and made them more dimensional.

This one I made for my niece for her 7th birthday.

I'm sharing this as part of Handmade Monday #53 which is hosted by Wendy from 1stUniqueGifts . If you've enjoyed reading through my tutorial why not pop on over to Wendy's and have a look at what everyone else has been up to.
Before I sign off I must apologise for the added security on the comments - I've had a couple of spam posts which have led to a not so nice website so until I feel confident that its not going to happen again I'm going to have to leave the moderations on the comments - I know its a pain but I wouldn't want anyone to click onto that site.
Anita
18/01/2012
Blog Dedicated to Weddings
Hello just a very quick blog today to let you know that I now have a blog that is dedicated to all things wedding. Not just my jewellery and accessories but things that I have come across on the web. I want to show things which are unique like today's post which is all about Skull wedding toppers - although they can be used just as home decorations if you wanted. Here is a link to the new website hope you will come and join me over there to - Itsamistry Wedding Designs


Aren't they just fantastic?
Anita
16/01/2012
If You Wear Red Today
These necklaces are for a raffle at a Forward Ladies event – “If You Wear Red Today” as part of National Red Dress Day on Friday 3rd February – raising awareness of heart disease in women. Money raised from the raffle will go to the Liverpool Heart and Chest Hospital. For more information and to book your place pop over to the events page on the Forward Ladies website


These beautiful red Swarovski hearts are embraced within a silver wire (non-tarnish silver plated) frame that has been hand-formed. Each heart is individual and unique the only similarity being the swirls that finish of the loose ends. Both necklaces will be attached to a faux suede 18 inch cord.

I also made these to list on my Etsy shop but I am letting my facebook, twitter and blog followers first refusal before I list them and add postage and Etsy charges to the price listed. Full description of each necklace can be found on my facebook page.

£25.00

£30.00
I know it's rather late but I'm sure Wendy won't mind me linking to her Handmade Monday post as it is still Monday.
Oh, what do you think of the new look?
12/01/2012
You Lift Me Up
Just a quick post today showing one of my cards with a sassy corset. The corset is a rubber stamp design by Pink Cat Studio - Lingerie set. I've painted it with my favourite Derwent Inktense watercolour pencils and added some jewels to the front. The tiny flower stamp is also part of the set and makes for a great border and as we all know you can never have enough bling I've added the tiniest of gems to the centres. I like this set of stamps as they are sassy and quirky and make me smile.


09/01/2012
Coat Update and Handmade Monday #48
Yay Handmade Monday by Wendy from 1st UniqueGifts is back after the Christmas and New Year break
I haven't made anything new this week as I've been catching up on the accounts. So my post today is an update on the coat that I started just before Christmas. I was determined to start and finish it before New Year but that didn't happen because of last minute orders and post office runs etc. But considering I've actually had the material and pattern for over 12 months just making a start was an achievement. I'm nearly there the lining and sleeves are in I just need to tack the sleeves in place on the inside and finish off the hem. I cut the sleeve to 3/4 because I wanted to add a cuff or something rather than have a straight sleeve.
You're probably going to think I'm crazy but I am going to cut out different sized flowers from the left over material and some contrasting coloured felt (black) and stitch those to the sleeve and add buttons or beads to the centre. Then instead of a button closure I am going to add a large hook and eye and cover it with a large layered flower again with buttons and/or beads. Well that's the idea. I think the red just needs to be broken up a little because it's quite long (calf length) and I feel its too much to wear all red on it's own. Plus I want to make it unique to me.

This is the pattern that I used.
Don't forget to pop on over to Wendy's blog to see what everyone else has been making.
07/01/2012
Desk Sharing and Happy Feet 2
Thursday started with the arrival of my 6 year old date- namely my gorgeous niece :) She's such a bubbly and happy little girl (99.9% of the time). Our day started of with her coming up to my workroom where she shared half my work desk with her colouring books. As she got stuck into doing some colouring I started drawing of a heart with wings. I'd found some doodles I'd made from when I was making the Sacred Heart ATCs. As I was drawing I could see little eyes peering over to see what I was doing and promptly a little voice asked if she could have a go and being the lovely aunt that I am I gave here some paper and a stencil with some hearts on it - I always encourage her to create freely and without making any suggestions unless asked and as you can see from the pictures she really enjoyed her making her heart with wings. After she had finished she cut it out and made it into a finger puppet - I wish I'd taken an photo of the heart because she really did do a fantastic job.
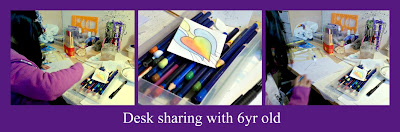 The middle picture shows my card. I have to add that I have removed the head and the lines under the heart and wings as they just didn't sit correctly. I still have to finish mine but it can wait.
The Happy Feet 2 refers to what we did in the afternoon - trip to the cinema to watch it in 3D. We thought we were going to be only ones in the theatre but as it happens a few more people did turn up. We both enjoyed it and had great fun trying to pop the bubbles at the end and yes I know they weren't real. I'm sure the other people in there must have thought we were both a little crazy but hey it was fun to laugh and giggle with a 6 year old.

The Happy Feet 2 refers to what we did in the afternoon - trip to the cinema to watch it in 3D. We thought we were going to be only ones in the theatre but as it happens a few more people did turn up. We both enjoyed it and had great fun trying to pop the bubbles at the end and yes I know they weren't real. I'm sure the other people in there must have thought we were both a little crazy but hey it was fun to laugh and giggle with a 6 year old.
04/01/2012
Heart Tree
Yesterday I posted these fabric Artist Trading Cards -which I am happy to say are on their way to new homes.


Before I started on the fabric cards I wanted to try out the "heart tree" on card to see if how it would look and work. I'm happy to say that it did because trees and hearts are 2 of my favourite things to draw (if you can call it drawing) and here it is -

Its drawn on Watercolour paper with faber-castell pitt pen and coloured with my favourite Derwent Inktense watercolour pencils and finished off with white gel pen.
03/01/2012
First post of 2012
Happy New Year!!!
I am going to blog more this year it's a shortfall of mine. So even if it's short and sweet I will try and post something on a regular basis.
In today's post I'm showing off the Artists Trading Cards that I've made for trading at ATCsforAll and for the sister site iATCs. Firstly we have cards for the "Trees Trees Trees" swap on iATCs. These are made from fabric and are painted with acrylic paints. I've added beads and sequins as embellishments and then used embroidery thread to outline the "trees".

Next we have the cards for the Sacred Heart swap over on ATCsforAll. The instructions for the cards was to use 3 of the 4 elements listed - wings, crown, thorns and flames. I went with wings, crown and flames as I couldn't get the thorns to look like thorns. I did have an idea of making a thorn crown out of wire but didn't go with it as these cards will be mailed out to the host and then onto the recipient and I didn't want risk them being delayed or taken out of the postal system for security reasons. For these I've used Derwent Inktense Watercolour Pencils, Faber-Castel Pitt pens and the card itself is Daler-Rowney -Bockingford Water Colour Paper 300gsm/140lb.

I hope you enjoy reading my rambles - I would love to know what you think so please feel free to leave a comment.
Anita
Subscribe to:
Posts (Atom)