Showing posts with label manchester uk. Show all posts

10/12/2014

What's On Your Work Desk? Wednesday #288

Good morning time for another WOYWW - go check out Julia's blog the Stamping Ground for all the details.

On my desk this cold Wednesday is a painting or at least my attempt at a painting.  It's at the very early stages where I've added some base colour.  I've never painted dark to light so it will be interesting to see if I can paint this way.  When finished it should be of a traditional Indian woman - well that's what I'm aiming for but we'll see.  As you can see the shading looks a bit dodgy hopefully that will correct itself as I work on it.  

I'm off to put it away for now as I need to make some more cards for the shop. Thank you to everyone who commented on last weeks post and apologies that I couldn't visit as many blogs as I would have liked to - hope to rectify that this week.    


Have a lovely day
Anita

30/10/2014

Travelling Journal - Live Your Dream

Here is another travelling journal which I have added my art to.  This little lady is hand drawn into the journal page and painted with water colour pencils, water soluble wax crayons a little bit of acrylic paint.  I've added some rubber stamped elements to the page to add some texture and interest to the background.  I like her dreamy look and the words "Live Your Dream" seemed appropriate.  I haven't drawn a face in ages so I'm really pleased with the way she's come out.  I'm also not very good with water colours due to the nature of them. 


Anita
#blogtoberfest14 day 30

22/10/2014

It's Time for WOYWW 281

Or as it's also known as What's on your work desk? Wednesday - find out more at the Stamping Ground.

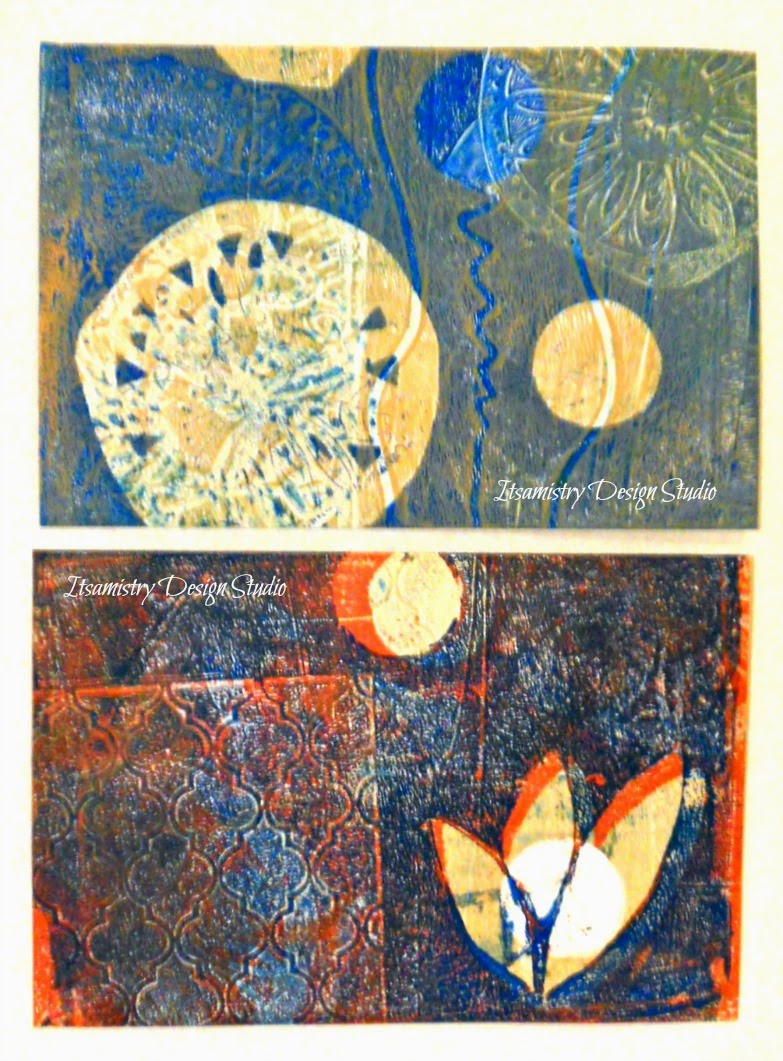
I've been playing with my gelli print again.  This time trying out the dark over light technique.  This involves allowing the paints to dry before adding the final dark colour prior to pulling the print.  I have to say I love this technique - I like being in control of the design and laying the design precisely as I want it.  on the desk there is scrap piece of thick tracing type paper which I salvaged from an envelope and I'm using to practice some designs and colour combinations.  You can also see perched on top of my pencils a fabric ATC (artist trading card) waiting to be finished off.


This is one of the prints I made using the dark over light technique.

These prints are just some normal prints  - the above 2 are on glossy card  which I've been told NOT to use as it will affect the gelli plate - lesson learnt.

These 2 were a couple of messing about prints just on copy paper which isn't ideal as it's too thin and goes wrinkly but that's okay they will get used in another project.

That's me for this Wednesdays WOYWW.  Do pop over to the Stamping Ground to see what everyone else has been up to.


Thank you to everyone who visits and leaves a comment on my posts.
Anita

I'm also linking up with Claire Justine for Wednesday Blog Hop 
#blogtoberfest14 day 22


12/10/2014

Past Present Future

A small canvas board measuring 5 x 7 inches with my interpretation of the feminine divine.  Painted with acrylics, the words Past Present and Future are from a stencil designed by The Altered Page (available from the Stencilgirl). The clock face and "all the things she never said" are rubber stamps.  It just needs to be sealed with some gel medium - semi mat.  

So that's it from me for today a very short blog post.  I'll be linking up with Handmade Harbour for Handmade Monday, Shells in the Bush for #Blogtoberfest14, Inky Dinky Doodle for Sunday Sentiments and ClaireJustine for Creative Mondays


Anita 


10/10/2014

Creating a Picture with Rubber Stamps

Day 10 of #blogtoberrfest - Hello everyone hope you have a wonderful weekend.  Today I'm going to show you how to create a picture using rubber stamps.  In the picture below I have used the Scroll Frames rubber stamp as an edge to a page in my journal.  I stamped it with the midnight ink pad  and then used a damp paint brush to move the ink around the swirls to add some shading to them.  I've added some pink highlights with some neocolor II water soluble wax crayons and added some black dots with a copic pen.  

The trees I made using one of the 2 inch Journal Circles and added colour with the wax crayons.  The dots, edge of the circles and the tree trunks were painted with the black acrylic ink to which I added some white acrylic paint to make them 'pop'. 

For the grass I used the feather stamp from the Big Christmas Collection and stamped it using the spring green ink pad. 


This young lady was a happy accident.  I was playing around with the stamps as you do when you first get them and as I stamped the larger of the scrolls I thought 'oh hello' this looks like curly hair.   I added some more 'curls' with the smaller swirl and hey presto a full head of curly swirly hair.  Don't you love happy accidents?


Happy Crafting 
Anita 


07/10/2014

Summer Sunshine

Day 7 of 'Blogtoberfest14 - it's soooo cold here today and it hasn't stopped raining.  Like many others I don't like the cold damp weather.  I did rebel a little bit and wore a light summer top but I think it will be the last time - unless of course the weather decides to give us a few more days of sunshine.

Anyway as a little reminder of sunny days I'm going to share one of my favourite pieces of jewellery.  This was custom made for someone who follows me on facebook.  I love the chain as it's so pretty and even though it's silver plated it doesn't lose it's shine if looked after properly.  I've used a mix red/orange and green glass beads.  Doesn't it remind you of summer?


This is a picture from it's new home and owner.
Till tomorrow
Anita

06/10/2014

Halloween Cuteness

Day 6 of Blogtoberfest14 and today I have been finishing off a Artist Trading Card for a Halloween swap I am hosting over on Art With A Heart - our theme is a mix of Halloween or Autumn.

This young man is made on mixed media card and I've used in most part Faber Castell polychromo coloured pencils.  I've added some white acrylic paint for the stripes and used a black copic pen (04) for the outlines.


I also made this 6 x 6 inch boxed canvas with a similar Halloween figure - we're going to name him Edgar Bertrand as suggested by a couple of my friends over on facebook.  On the canvas I've used mainly acrylic paint and added a few stencil elements.  I took the picture before I finished off the eyes so he does have the bloodshot look.


Want to know more about #blogtoberfest14 then pop on over to Shells in the Bush 

Till tomorrow
Anita


03/10/2014

A Nip and A Tuck WIP Blogtoberfest14 Day 3

A very quick post from me today.  This young lady just needs a little nip and tuck to finish her off.  I started her a couple of days ago and added the colour and stencil designs last night. She's coloured in with Neocolorll water soluble wax crayons and then stenciled with acrylic paints.  The background texture has been added with bubble wrap.

Want to know more about Blogtoberfest14 then pop over to Shells in the Bush and see who else is taking part.,


02/10/2014

Day 2 Of Blogtoberfest14 Confetti/Sweet cones.

Today I have a very simple tutorial to show you using a corner design rubber stamp.  I have used the small Christmas Corner Stamp from Oak House Studio to stamp the design along 3 sides of a piece of rectangular paper with the spring green, dusky pink and sea blue ink pads also from Oak House Studio.  I used a heavier plain white printer paper so it would hold it's shape when twisted into the cone shape.  As you can see from the pictures below its a pretty simple process - stamp and twist.  These are now ready to be filled with sweets or maybe a little treat as a gift for someone special.  Don't forget to pop over the Shells in the Bush to see who else is taking part in  Blogtoberfest14 - 31 days of blogging.


01/10/2014

WOYWW #278 and Blogtoberfest

Good morning to you all on this sunny Wednesday.  It's time for WOYWW - What's on your workdesk Wednesday #278.  You can find out more about WOYWW at the Stamping Ground.  

Today is also the start of Blogtoberfest - the idea behind this is to blog everyday of October - more details here on Shells In the Bush blog. 

I have a messy desk with not much going on today.  There is a card which is something I've been working on with rubber stamps from Oak House Studio where I'm on the DT and was trying out some different uses for the stamps.  The skellies and cotton reels are for a swap on iATC  called Oddball Art Ornaments.  Not sure what I'm going to make yet.  I have an idea but how to execute it is the next step.

So that's it from me for this weeks WOYWW.  I'll be back tomorrow (hopefully) for Blogtoberfest. 


24/09/2014

What's On Your Workdesk - WOYWW 277

Time for this weeks WOYWW - What's on Your Workdesk Wednesday.  Want to know more then pop on over to the Stamping Ground.  

On my desk this windy Wednesday is a painting of a face.  I recently bought some acrylic inks from Oak House Studio.  I love painting with acrylic paint but have never tried the inks.  I did find them challenging as they do dry very quickly so you can't blend the colours together.  After a few goes just using them on dry paper I decided to wet the paper I was using and use the inks as you would use water colour paints.  I think this technique worked better but you do have to be careful and let the paint dry first if you don't want it to bleed - like the lips - they were still slightly damp and when I added the water around the face the red from the lops bled onto the upper lip and under the nose.  A lot more practice is needed me thinks.

Want to see what other artists have on their desks this Wednesday?  Then pop on over to the Stamping Ground and follow the links you never know who you're going to bump into.


Have a wonderful Wednesday
Anita

23/09/2014

Inky Backgrounds

Happy Tuesday everyone.  Today is all about creating backgrounds with spray and acrylic inks.  For these backgrounds I've used glossy photo paper.  I have a whole stash of them which came with my printer. Normally I would use alcohol inks on them but thought I would have a play with the inks from Oak House Studio.  
You don't have to have photographic paper in fact it's probably better if you can use the glossy paper for encaustic wax.  Why?  well the photographic paper is designed for the ink to dry quickly and ebbed itself into the paper when you print on it and the encaustic from what I can remember isn't as porous and so has a slow drying time.  Having said that I'm pretty pleased with how these backgrounds have turned out.

I haven't done a tutorial for these as there really is no right or wrong way of making these.  I started off by spraying plain water to the paper, then added the spray inks and then sprinkled/splodged/flicked the acrylic ink with an old paint brush.  Carry on adding plain water or the spray inks until you are happy with how the paints have merged and then either leave them to dry or use a heat gun.

Pop back again to see how I use these in one of my projects. 


Well I'll be back tomorrow - until then happy crafting
Anita

21/09/2014

TAg YoU'rE IT Tutorial- Handmade Monday

Hello everyone hope you've had a wonderful weekend. The weather has been kind to us here in the UK and it stayed dry for the Walk of Hope stroll around Tatton Park yesterday for The Christie Hospital -you can see a pic here

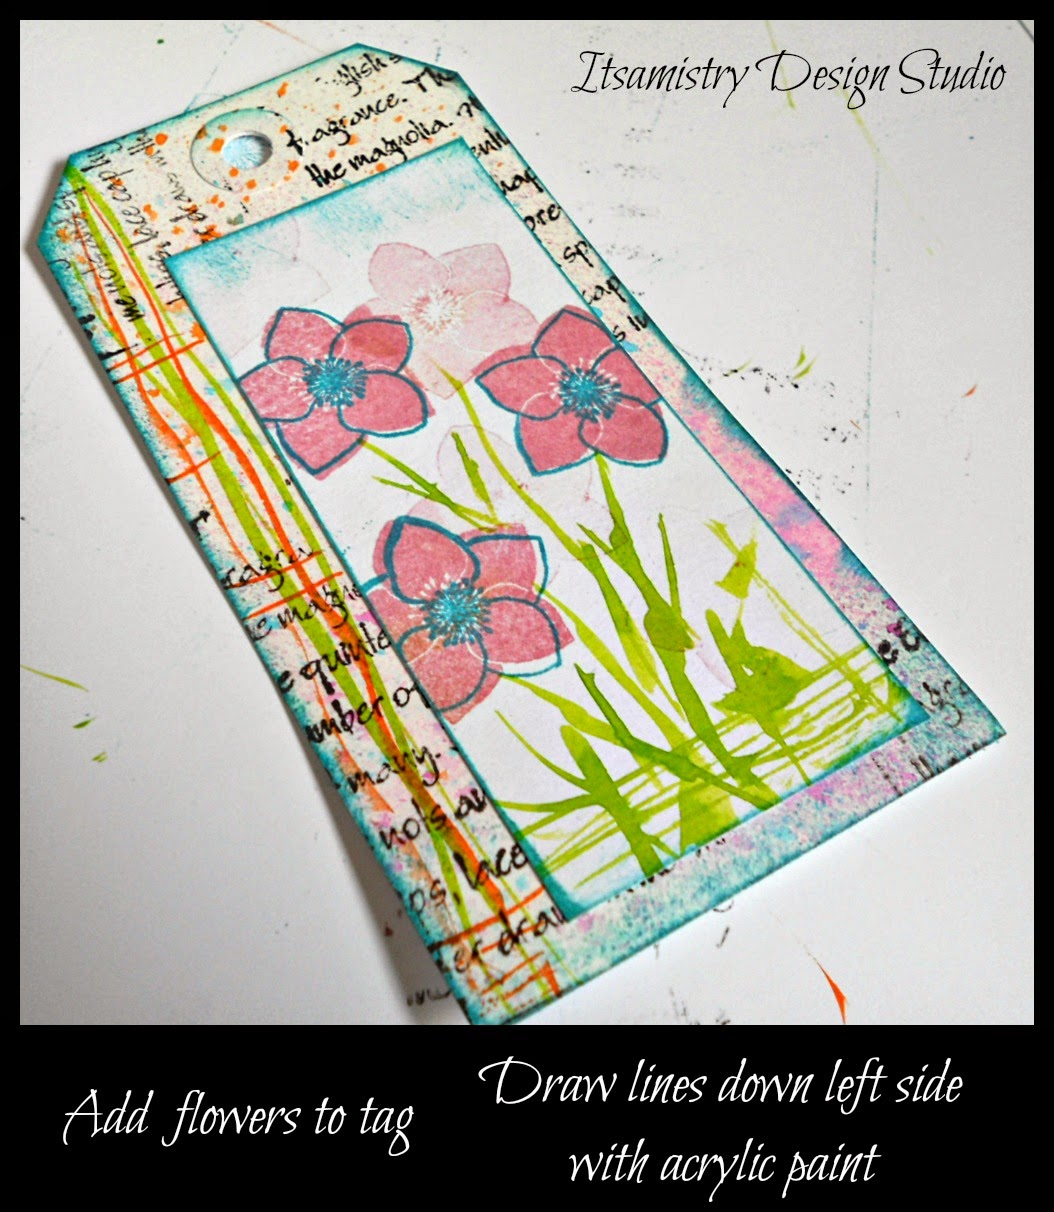
Today I've been playing with some floral stamps from Oak House Studio.  The stamp is part of the Big Christmas collection and is proving to be one of my favourites - there is a positive and negative so great for creating different textures.  All the products I've used in this tutorial are available from Oak House Studio (ribbon and gems are from my stash).

I've made a step by step tutorial if you fancy having a go at making these tags. 

So here goes - 

1.  Gather all your ingredients.  


2. Apply spray inks in your colour choice - I've used citrus orange, totally turquoise and regal claret. Randomly stamp the text with black ink and add ink around the edge of the tag with the sea blue ink pad - just run the ink pad directly onto the edge using a gentle stroke.  Put to one side.


3. Cut a piece of card which is smaller than the tag.  Stamp the solid flower using the dusky pink ink pad and then the outline stamp with the sea blue.  You'll notice that there are a few lighter solid flowers - I stamped these after the initial flowers had been stamped and there is usually a little bit of ink still on the stamp (no point wasting the ink right?).  Add a border again using the sea blue ink pad as in the previous step.


4.  Next we need to add the leaves.  Here I've used the Oak House Studios acrylic inks and a nail art brush (which you can get from Poundland yep you read that right :) )  Dipping the brush lightly and making sure you don't have too much ink on the brush all you need to do is gently stroke the brush in the areas where you want grass/stems and leaves.  You don't have to be too neat to do this.


5.  Glue the smaller stamped card onto the tag (on this one I've glued it off center and to the right.  I've added a few lines of acrylic ink along the left side of the tag using peridot and amber inks with the nail art brush.


6.  I finished off the tags with some ribbon and gems which I added to the middle of the flowers.


Here are a couple of cards I made using the same flower stamp.


I hope you've enjoyed the tutorial - You can find the stamps here
and the ink pads, sprays and acrylic inks here  

I'm linking up with the Handmade Harbour for Handmade Monday and Creatives Mondays 

Happy Crafting
Anita

26/08/2014

Back From My Holiday & Design Team Announcement

Hey lovely peeps I'm back from my holiday in Rochester NYC.  I was there for an art convention with 26 other artist who I know from ATCsforALL.  We had a weekend of making and trading art - although I'm sure there was much more socialising being done than art as most of us had made our art for trading before we arrived in Rochester. 

Now onto the Design Team - before I left for Rochester I applied to Oak House Studio's call out for new Design Team members and while I was on holiday I received an email from Lynnda who owns Oak House Studio to say I had been successful.  Now to keep quiet about it for nearly 3 weeks has been really difficult - but yay now I can shout it out to everyone and I can tell you that you are in for a treat as the stamps and inks are just lovely and I get to play and get creative with them.  So don't forget to subscribe to this blog or get email notifications to keep up to date with what's happening and not to miss out on the tutorials/instructions I'll be posting.

Before I go here are some photo's from the art convention.

Huggles with Sarah 

Outside the Brainery with Cindy, Ann, Sarah and Karen

Collage of the art room and the artists 


20/06/2014

Summer Of Colour4 Week 2

So it's week 2 of the Summer of Colour 4 challenge over on Twinkle Twinkle Like A Star and this week I've made a couple of pieces both of them abstract.  One is an Artist Trading Card (ATC) and the other is a larger piece where I started out with circles which were supposed to have been abstract trees but ended up being some weird and odd looking alien birds - or at least that's what they look like to me.  

This weeks colours were Teal, Coral and a Dash, Splash or Splodge of White.  The coral colour came out rather orange on the ATC but I think I've got it a better shade on the larger piece.  The only thing I couldn't do was get the correct shade of teal to come through on the photograph.

Coral, Teal and White

Abstract ATC

Abstract Alien Birds

18/11/2013

Whimsical Landscape...............Handmade Monday #143

Drawing landscapes as a child was easy because it didn't matter that things weren't in proportion.  I'm in a drawing group over on ATCsforALL and one of the weekly prompts was to make whimsical landscapes.  Trying to work out proportions was interesting as the landscape I had drawn had quite a few 'hills' and getting the trees to be the right size was challenging.  What do you think?  Here are some pics from start to finish.


The original sketch

Adding colour bit by bit


The finished landscape.

Materials used- Faber Castell Polychromo pencils, white gelly pen. The darker outlines are made using a 2B pencil.

Pop on over the following blogs for more creative ideas - 


11/11/2013

Handmade Monday & Art Every Day Month

Oooopppps I lapsed with the #AEDM the last couple of days but in my defense I have been busy making for Emerge 3Rs Pop Up Shop where I'll be selling some of my handmade cards and jewellery.  I've also been making cards for the Handmade Harbour Design Team so it's all go this week.

Here are some of the cards I've made for Emerge 3R.  The trees and abstract pieces are made from air-dry clay.  The design is made with a rubber stamp painted and with black and silver acrylic paint.


This cute robin has also made his way into the shop.  He's a digi stamp from Handmade Harbour and you can find him here #235 Robin with Stocking.  I like the way you can customise the design to make it look different every time you use it as you can see from the 2 cards above.

Pop over to Handmade Monday  Art Every Day Month and Creative Monday to see what other artists have been making.
Anita