11/12/2013

Merry Christmas Mid Week Paper Craft Party Design Team

I wanted to try something a little bit different for today's theme "Merry Christmas".  It's nice to use designs which are specifically made for Christmas but sometimes you just have to challenge yourself so today I want to show you how you can use a design which isn't for Christmas.  

I'm using #217 cute cat with balloons digi stamp.....okay so you're wondering how this can be turned into a Christmas card...right?  Well here goes - I printed the design onto water colour paper and coloured it in with a selection of watercolour pencils (prisma and faber castell).  Next I added white circles randomly over the card with acrylic paint - I used a pen top dipped into the acrylic.  I also used the presents from #189 presents and gifts 10 in 1 painted those with watercolours and added some gems to add texture and I like sparkles on my gifts.  The tree I made from air-drying clay and embossed it with a rubber stamp before cutting it out with a cookie cutter - let dry over night and then painted with acrylic paint and added glitter.  The banner 'Let it Snow' is #226 Christmas Tags and Sentiments.  Oh and the santa hat is done digitally because I forgot to make one before I'd started editing (hope I'm forgiven for that but it looks pretty cool).

I hope you like my idea of using a non Christmas design and making it Christmasy. 


So as you know I added the digital hat to the cat in the above design well I had a play and did this using Picmonkey which is a free online photo editor.  I didn't get time to print it and add colour to the whole design but hopefully it will have given you another option of adding elements to the digi stamps.   

Hope you've enjoyed reading my post today. 
Please pop over and see what the rest of the design team have been making over on Handmade Harbours Midweek Paper Craft Party.

Anita


08/12/2013

Beaded Bead Tutorial

I made this beaded bead back in 2010 and submitted to Beads & Beyond jewellery magazine where it was featured.  Since then I've taught a few workshops here in the UK and USA at an artfest.  As I don't have a studio to run workshops from now I have decided to put the tutorial up here for you to use for free.  


TITLE - ANANTA (Endless. Infinite)

TIP - For extra security and bead strength go through all the 6mm beads again tying half hitch knots every so often.  Once you are satisfied tie of the thread and apply a drop of glue to the knot.  Always follow thread route.
  
GATHER THESE INGREDIENTS -

Beading needle,
Beading thread (I prefer KO)
Matsuno seed beads size 11,
2 bead caps 14mm,
x8 Jet Black AB 6mm round Czech crystal (MC)
x12 Half Silver 6mm AB round Czech crystal (SC),
x3 head pins,
Sterling or plated silver 0.8mm wire (approx 10cm),

Flat nose pliers, and wire cutters

METHOD

1.  Take a comfortable length of thread and thread onto needle.  Add 4 alternate beads and tie together to form a square – leave an 8inch tail.  Go through all beads again exiting a SC bead.

1

2. Add 3 beads (MC/SC/MC).  Go through all the beads again exiting (SC).  Repeat this one more time

2

3. Fold in half so that the 2 SC beads meet each other.  Add a MC bead pass needle through the next SC, add another MC crystal go through the last SC bead to form a square.  Go through all 4 beads again exiting one of the SC beads. Tie a half hitch knot to secure. 

3

4. Pick up 7 seed beads and pass needle through opposite SC diagonally.  Pick up 2 seed beads and pass needle through the 4th seed bead of the 7 beads that have been added.  Pick up 2 seed beads pass needle through the first SC bead that you started from.  You now should have a kiss of seed beads.  Repeat until all sides are covered with kisses,

4

5. The finished bead.

5

6.Making the Pendant

Cut a piece of wire approx 10cm and create wrapped loop at one end.

Thread the following in sequence onto the wire-
x1 6mm SC crystal
Bead cap
x2 6mm SC beads
Your beaded bead –push one of the 2 beads added previously into the middle of the beaded bead
x1 6mm SC bead
Bead cap
x1 6mm SC bead

Create a wrapped loop at the other end. 

Wire wrap x3 of the 6mm SC crystal beads to one of the wrapped ends of the pendant.  Slip onto sterling silver chain or coordinating ribbon/faux suede.


Here is an image from the Beads and Beyond article

This necklace is made with different sizes of the beaded beads for a dramatic necklace.

I hope that you enjoy the tutorial and you will link to what you have made.  Please note that this tutorial is for your own personal use and not to be sold. I would be grateful if you do make the beaded bead and post it on your blog that you link back to this post.

Have fun any questions please ask and I'll try to answer as soon as I can.

Anita

I'm linking up with
Go check out some lovely crafters.

02/12/2013

How to make bookmarks or gift tags from scraps of paper


Gather your ingredients - scraps of paper, glue and a sheet of card to stick your scraps onto.  I used an A3 size card you can use A4 which is what most crafters have in their stash of cards.

This is what I call the "eww" stage because it looks like a 5 year old's work.

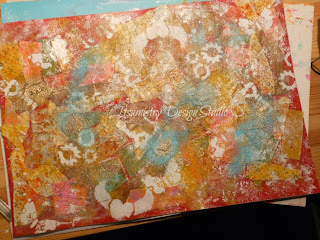
Next start adding paint - I used acrylic paint and added it using a crumpled up piece of bubble wrap - randomly.  You can use anything you like to paint with fingers, crumpled up paper towels, an old credit card etc.  

I then used a stencil with white acrylic paint to sections of the background.

  Over this I added spots of gel medium (with my fingers) and sprinkled some embossing powder (the turquoise bits) into it and heated it with a heat gun - on top of this I did the same again but this time I added some gold embossing powder.  

I also added some fibres which added texture but lost its sheen as I went over it with paint and glue - so you may want to leave it out or add it at the end.


These 2 pictures show a close up of the embossing powder and the texture it creates.  The more I heated it the bubblier it got - just make sure you have a good ventilated room - embossing powder is meant to be used with embossing pads to adhere the embossing powder but I like to experiment and gel medium worked really well (didn't give off any smell but just to err on the side of caution make sure you don't over heat it).

After the background has dried you can cut them to any size you want.  I cut mine to 12cm by 6cm.  I then mounted these onto coordinating card and cut around them so the clean card showed around the edges - you don't have to do this I just think it finishes the tags/bookmarks off and it covers the back of the original background - mine got glue and paint in parts.

Now you don't have to do this stage but I added some embellishments just to make them that more interesting and unique.  I used some odds and ends I've had in my collection box - you can use images out of magazines, text from newspapers in fact anything you like. 

To finish off I punched a hole at the top and added some fibres.

I hope you enjoy the tutorial.
Anita

Same Elements Different Look & Handmade Monday

It's time for Handmade Monday over on the Handmade Harbour blog.  My post today looks at how you can use the same elements but make each card different and unique.

I don't know about you but I get bored making multiple card that look the same (unless they are for an order).  I also like to give my customers unique cards to buy.  

I made the following using some text paper which I had printed and cut into triangles and mounted onto co-coordinating background paper.  The circles are lengths of quilling paper from my quilling days many moons ago - I have quite a collection.  I like how the tight coils lend themselves to the design of the trees as baubles and tree trunks.


I added a silver snowflake which was cut from a tree garland and the greeting is a rubber stamp from Stampendous.

I made different size coils with the quilling paper and added them in a line to make them look like a tree. 

I've also linked up with the following blogs.

Have a wonderful and creative week.
Anita


29/11/2013

Don't Forget Me......

...............is a card made using my original artwork printed onto matt photo paper.  I've added digital elements to it using a free online software called picmonkey.  It's really easy to use and has some neat features.  To the original art I added some rubber stamping to the background and the main body of the artwork was hand-drawn and painted using watercolours.  It's now available to buy in my Etsy shop for £2.50 +£1.00 postage.  The card is blank for your own message.

27/11/2013

It's Party Time Over At Handmade Harbour

It's time to get the party started (isn't that a line from a song?).  Anyway, it's that time of the week and we're partying over at Handmade Harbour so lets get our lovely sparkly outfits out and dance the night away..............well okay may be not quite so early.  I don't know about you but I'm so not prepared for Christmas.  I bought a couple of presents while I was out on Monday at the Christmas Market in Manchester so that's a start.  I finish work in a couple of weeks so I'll probably do most of it then.  

Have you started on your Christmas card making yet?  I know some people start theirs in January I think I'd probably forget where I'd put them if I started that early and everyone who knows me will think I'm not well :)

Well here are 2 different cards for the Papercraft Party over at Handmade Harbour.  I hope you like them and feel inspired to create your own cards with Wendy's lovely designs.  If you fancy joining in with the challenge and win yourself some digi stamps and a lovely badge to put on your blog all you have to do is create a card using one of Wendy's designs (not compulsory - although how can you resist some of the free digi stamps to wet your appetite?  

Whatever you decide to do I hope you have a lovely week.


You can find all the Christmas stamps here
If you fancy having a play with digi stamps you can find a couple of free images here

I do hope you'll join in the fun.
Anita


25/11/2013

Lilac and Silver Christmas Trees.

It seems like ages since I used a rubber stamp in its own right.  So when I saw the challenge on the Artful Times Challenge Blog I knew I had to join in especially as the colour scheme is one of my favourites - lilac and silver.

One of the stamps I've used is from Penny Black called Xmas Constellation the other I'm not sure of as I'd taken it off the wooden block for better storage and the ink on the back where I had written the company name has smudged - if anyone recognises it please give me a shout so I can credit the designer.

This is the Xmas Constellation stamp from Penny Black.  I love all the swirls and fluidity of the design.

I liked this one for it's non traditional style again with the swirls - can you tell I like swirls?  


These cards are linked to the following blogs as well so why not pop over and have a nosey around at what everyone has been making.


Happy Crafting
Anita

19/11/2013

Art Every Day and Gritty Jane's 40 Portraits

I've not really kept up with posting everyday for this challenge because I've been busy with a couple of commissions.  I have been creating every day and I'm including the commissions as part of this - I can't show you them as they are for presents.  I can however show you a couple of drawings I've done in the last few days.  They're what is described as whimsical and they are part of another challenge on facebook called "Gritty Jane's 40 Portrait Challenge". Fortunately there is no time limit on this one so no pressure to produce something everyday.  You'd think I had enough to do coming up to Christmas - but hey I like a challenge and I've met some amazing artists on my "challenge" journey.

#1/40
This one is in my altered book.  I gessoed the page but I found that watercolour and gesso do not like each other.  

#2/40
This one is on water colour paper and is painted with inktense pencils and neo colours.  The white highlights are acrylic and I've added some stamped images to fill in the background.

Fancy a challenge? Here are the links to both pages - 

Anita


18/11/2013

Whimsical Landscape...............Handmade Monday #143

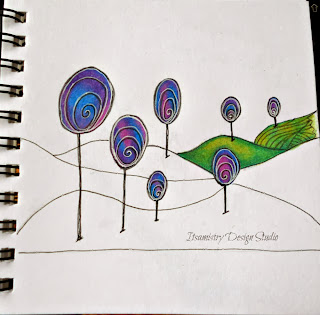
Drawing landscapes as a child was easy because it didn't matter that things weren't in proportion.  I'm in a drawing group over on ATCsforALL and one of the weekly prompts was to make whimsical landscapes.  Trying to work out proportions was interesting as the landscape I had drawn had quite a few 'hills' and getting the trees to be the right size was challenging.  What do you think?  Here are some pics from start to finish.


The original sketch

Adding colour bit by bit


The finished landscape.

Materials used- Faber Castell Polychromo pencils, white gelly pen. The darker outlines are made using a 2B pencil.

Pop on over the following blogs for more creative ideas - 


13/11/2013

Christmas Is Coming - Handmade Harbour Paper Craft Party

It's time to start thinking about Christmas!! Time to get your list ready for buying presents and cards.  The Christmas market starts this week (15 November) in Manchester and I can't wait I always enjoy browsing the handmade stalls and chatting to the traders and partaking in a glass of warm fruity cider - I'm not a fan of mulled wine.  

I've been busy this week making cards to sell at Emerge 3Rs pop up shop in Manchester so if you're visiting the market you should pop in and see the lovely handmade items on sale there.  You will find some of my cards and jewellery there to.

If you like to make your own cards then why not have a look at Handmade Harbour's digi stamps they are so cute.  Here are some cards I've made using the stamps - you can find them all here in the Christmas album.


I'm off to make my list......
....Anita

12/11/2013

Simple Yet Elegant Bracelets....#AEDM

It's been a while since I made any other than commission based pieces.  I had a couple of spare packs of mixed beads in my vast collection and which I hadn't had time to do anything with.  They lend themselves to making memory wire bracelets very well and every bracelet looks different due to the mix of beads even when using the same colour scheme.  Here I have 2 different shades one which has a copper tone and one which would look great worn with blue tones or even to dress up a denim outfit.

Memory wire bracelets - 
Art Every Day Month day 12 a different kind of creative today.
Anita

11/11/2013

Handmade Monday & Art Every Day Month

Oooopppps I lapsed with the #AEDM the last couple of days but in my defense I have been busy making for Emerge 3Rs Pop Up Shop where I'll be selling some of my handmade cards and jewellery.  I've also been making cards for the Handmade Harbour Design Team so it's all go this week.

Here are some of the cards I've made for Emerge 3R.  The trees and abstract pieces are made from air-dry clay.  The design is made with a rubber stamp painted and with black and silver acrylic paint.


This cute robin has also made his way into the shop.  He's a digi stamp from Handmade Harbour and you can find him here #235 Robin with Stocking.  I like the way you can customise the design to make it look different every time you use it as you can see from the 2 cards above.

Pop over to Handmade Monday  Art Every Day Month and Creative Monday to see what other artists have been making.
Anita

07/11/2013

Whimsical Landscapes & Day 7 of #AEDM

Thursdays are late start days at work so this morning before leaving for work I started a couple of whimsical landscapes.  I'm taking part in a daily drawing group on ATCsforAll  and this weeks challenge was whimsical landscapes. Now I can draw a hill and something on it but getting the dimensions correct on multiple hills/mountains is something I struggle with.  After some trawling through google images to get an idea of how other artists were placing their elements I made a start with these 2 drawings.  Bare in mind these are still work in progress and will change as I complete it.  


I also altered the mouth on the drawing from yesterday and took away the design on the dress.  I think it looks much better this way and think I will leave it as it is.  What do you think?


I'm popping over to Art Every Day Month why not join me and see what everyone else has been busy creating.
Anita

06/11/2013

Quick Sketch.......Day 6 #AEDM

A very quick post from me today.  This is a sketch which I'm still working on I started it a few weeks ago to keep up with the daily drawing so I don't slip back into bad habits.  It needs cleaning up but I'm not happy with the mouth so I'm going to re-work it.  I added some of the background today in work.  It was too cold and wet to go out in my lunch hour.  Can't say I'm a fan of the cold and wet weather.  

I may take a few elements out like the bobbles on her dress I think it's to similar to the background.  Luckily it's only at the pencil stage.

Pop on over to Art Every Day Month to see what everyone else has been up to.  There's some fabulous artists out there.
Anita

05/11/2013

Day 5 of #AEDM

Today is a work day so no art has been made.  I had intended to do a quick sketch but it took me an extra half hour to get home so that got put on hold.  However I did receive 2 "faces" in the post - well drawings of faces.  I'm in a round robin type collaboration with 3 other artists who did the 29 Day Face Challenge.  The host of the challenge made up teams of 4-5 depending where in the world you are and each artist starts off a painting/drawing and passes it onto the next artist.  So by the end of of the challenge we should all end up with a face which has been worked on by 4 different artists and their style of drawing/painting.

This is what came today and which I need to add to. Once everyone has got their original pieces back I will do another post showing the whole process.

You can join in the fun with Art Every Day Month or just have a browse through and see what the other artists have to share here 


Have a lovely evening
Anita

04/11/2013

Christmas Card Robin with Stocking .......Day 4 of Art Every Day Month

I'm sharing this lovely little chappy with you today.  He's waiting very patiently for Santa to come and fill up his stocking.  Isn't he cute? 

This is a digi-stamp from Handmade Harbour #235 Robin with Stocking you can find him here.  I've painted him with Polychromo pencils and added some glitter to his hat and the branch.  The parcels and text are done on the computer.  I 3D'd the hat with foam pads to give the card some dimension.

Art Every Day Month Challenge can be found here

Anita

03/11/2013

Art Every Day Month Day 3........Felt Brooches

I missed day 2 of the Art Every Day Month but I do have a good reason why.  I had a post on my facebook page asking if I'd be interested in putting some of my work in a pop up shop in Manchester.  So yesterday I went and had a look and met up with Lisa the lady who runs the shop.  It's lovely and has some beautiful handmade items.  I was so overwhelmed with the lovely comments I received about the sample pieces I'd taken in.  

So now I am busy making up stock for the shop -yep I decided to go ahead and give it a go.  The shop had a steady stream of customers coming in while I was there and when the Christmas market starts in a couple of weeks I can see it getting really busy especially as there is going to be a cafe set up outside and a host of craft huts which will lead from the main market at Albert Square to Spinningfields.

Today's make are some beaded felt flowers.  The flowers are cut with a sizzix die cut and the beads hand sewn into the middle.  I've gone for some pretty bright colours - we all need some colour especially as the days are now cold, damp and grey.  

Don't forget it's also Handmade Monday over on Handmade Harbour blog and Creative Monday. Pop along and see what other crafter's have been up to.


Stay warm and craft
Anita

01/11/2013

Art Every Day Month November Day #1............Another Feather

Today is the start of a new month and a new challenge to create a piece of art every day for the next 30 days.  You don't have to create a new piece it can be a larger piece of art which you add to daily.  the idea is that you 'do' something creative each day.  You can read more about the challenge and join in at Create Every Day.

My art for today is another feather for the artist collaboration over on Avoxtar's blog.

This one is made on watercolour paper (2 layers to make it sturdy).  I've painted the background with Derwent Inktense watercolour pencils, added some design elements with black Pitt pens and white acrylic paint and white gel pen.  The flowers are a rubber stamp.  I've just got to add the ribbon which will be used to attach the feather to the bird.


Anita