02/10/2014

Day 2 Of Blogtoberfest14 Confetti/Sweet cones.

Today I have a very simple tutorial to show you using a corner design rubber stamp.  I have used the small Christmas Corner Stamp from Oak House Studio to stamp the design along 3 sides of a piece of rectangular paper with the spring green, dusky pink and sea blue ink pads also from Oak House Studio.  I used a heavier plain white printer paper so it would hold it's shape when twisted into the cone shape.  As you can see from the pictures below its a pretty simple process - stamp and twist.  These are now ready to be filled with sweets or maybe a little treat as a gift for someone special.  Don't forget to pop over the Shells in the Bush to see who else is taking part in  Blogtoberfest14 - 31 days of blogging.


01/10/2014

WOYWW #278 and Blogtoberfest

Good morning to you all on this sunny Wednesday.  It's time for WOYWW - What's on your workdesk Wednesday #278.  You can find out more about WOYWW at the Stamping Ground.  

Today is also the start of Blogtoberfest - the idea behind this is to blog everyday of October - more details here on Shells In the Bush blog. 

I have a messy desk with not much going on today.  There is a card which is something I've been working on with rubber stamps from Oak House Studio where I'm on the DT and was trying out some different uses for the stamps.  The skellies and cotton reels are for a swap on iATC  called Oddball Art Ornaments.  Not sure what I'm going to make yet.  I have an idea but how to execute it is the next step.

So that's it from me for this weeks WOYWW.  I'll be back tomorrow (hopefully) for Blogtoberfest. 


25/09/2014

Practice, Practice and Practice Some More

Following on from my post yesterday (WOYWW) I have had another play with the acrylic inks.  I think I'm getting the hang of them.  I've found that if I let the inks dry before adding more it works better.  The other thing I've found is that the colour looks different once it's dried and that I can layer the inks much better than trying to do it while wet.  

I toned down yesterdays painted face with white acrylic paint (tube not ink) so it doesn't look yellow.  I think it looks much better.  I'm still practicing the facial features and trying to get the shading correct.  I'm pretty pleased with the rough pencil sketch and shading I've done in the top right hand corner.  


Well I'm off to do some more practicing- catch you later.
Anita

24/09/2014

What's On Your Workdesk - WOYWW 277

Time for this weeks WOYWW - What's on Your Workdesk Wednesday.  Want to know more then pop on over to the Stamping Ground.  

On my desk this windy Wednesday is a painting of a face.  I recently bought some acrylic inks from Oak House Studio.  I love painting with acrylic paint but have never tried the inks.  I did find them challenging as they do dry very quickly so you can't blend the colours together.  After a few goes just using them on dry paper I decided to wet the paper I was using and use the inks as you would use water colour paints.  I think this technique worked better but you do have to be careful and let the paint dry first if you don't want it to bleed - like the lips - they were still slightly damp and when I added the water around the face the red from the lops bled onto the upper lip and under the nose.  A lot more practice is needed me thinks.

Want to see what other artists have on their desks this Wednesday?  Then pop on over to the Stamping Ground and follow the links you never know who you're going to bump into.


Have a wonderful Wednesday
Anita

23/09/2014

Inky Backgrounds

Happy Tuesday everyone.  Today is all about creating backgrounds with spray and acrylic inks.  For these backgrounds I've used glossy photo paper.  I have a whole stash of them which came with my printer. Normally I would use alcohol inks on them but thought I would have a play with the inks from Oak House Studio.  
You don't have to have photographic paper in fact it's probably better if you can use the glossy paper for encaustic wax.  Why?  well the photographic paper is designed for the ink to dry quickly and ebbed itself into the paper when you print on it and the encaustic from what I can remember isn't as porous and so has a slow drying time.  Having said that I'm pretty pleased with how these backgrounds have turned out.

I haven't done a tutorial for these as there really is no right or wrong way of making these.  I started off by spraying plain water to the paper, then added the spray inks and then sprinkled/splodged/flicked the acrylic ink with an old paint brush.  Carry on adding plain water or the spray inks until you are happy with how the paints have merged and then either leave them to dry or use a heat gun.

Pop back again to see how I use these in one of my projects. 


Well I'll be back tomorrow - until then happy crafting
Anita

21/09/2014

TAg YoU'rE IT Tutorial- Handmade Monday

Hello everyone hope you've had a wonderful weekend. The weather has been kind to us here in the UK and it stayed dry for the Walk of Hope stroll around Tatton Park yesterday for The Christie Hospital -you can see a pic here

Today I've been playing with some floral stamps from Oak House Studio.  The stamp is part of the Big Christmas collection and is proving to be one of my favourites - there is a positive and negative so great for creating different textures.  All the products I've used in this tutorial are available from Oak House Studio (ribbon and gems are from my stash).

I've made a step by step tutorial if you fancy having a go at making these tags. 

So here goes - 

1.  Gather all your ingredients.  


2. Apply spray inks in your colour choice - I've used citrus orange, totally turquoise and regal claret. Randomly stamp the text with black ink and add ink around the edge of the tag with the sea blue ink pad - just run the ink pad directly onto the edge using a gentle stroke.  Put to one side.


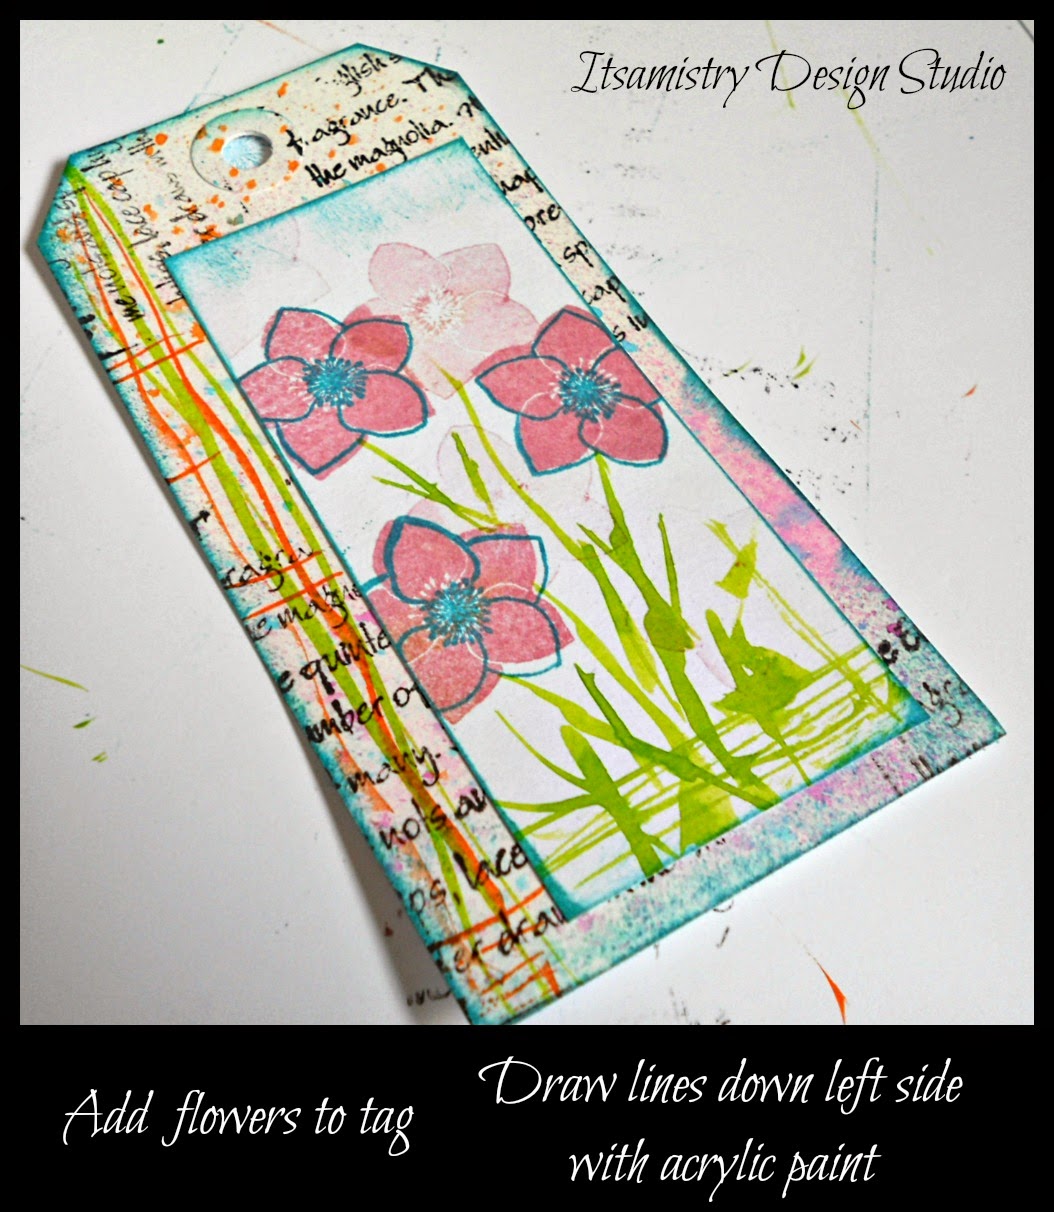
3. Cut a piece of card which is smaller than the tag.  Stamp the solid flower using the dusky pink ink pad and then the outline stamp with the sea blue.  You'll notice that there are a few lighter solid flowers - I stamped these after the initial flowers had been stamped and there is usually a little bit of ink still on the stamp (no point wasting the ink right?).  Add a border again using the sea blue ink pad as in the previous step.


4.  Next we need to add the leaves.  Here I've used the Oak House Studios acrylic inks and a nail art brush (which you can get from Poundland yep you read that right :) )  Dipping the brush lightly and making sure you don't have too much ink on the brush all you need to do is gently stroke the brush in the areas where you want grass/stems and leaves.  You don't have to be too neat to do this.


5.  Glue the smaller stamped card onto the tag (on this one I've glued it off center and to the right.  I've added a few lines of acrylic ink along the left side of the tag using peridot and amber inks with the nail art brush.


6.  I finished off the tags with some ribbon and gems which I added to the middle of the flowers.


Here are a couple of cards I made using the same flower stamp.


I hope you've enjoyed the tutorial - You can find the stamps here
and the ink pads, sprays and acrylic inks here  

I'm linking up with the Handmade Harbour for Handmade Monday and Creatives Mondays 

Happy Crafting
Anita

Silent Sunday 21 September 2014


17/09/2014

What's On Your Workdesk? Wednesday 276

I'm trying to get back into regular blogging again and have re-found the blogs I used to participate in one of which is run by Julia called the Stamping Ground.  Every Wednesday Julia runs a blog post called What's On Your Workdesk? Wednesday or WOYWW for short.  The idea is that you show a photograph of what is on your work desk - cause we're a nosy lot of artists and love snooping around other artists work area.  I do hope Julia will let me play again.

On my desk today are 2 hands.  These are for a swap on an ATC site that I am a member of.  The theme for the hands is Things That Go Bump In The Night.  I'm afraid my little pumpkin monsters aren't very good at making anything go "bump" in the night but are very good at collecting for Trick or Treat.  I have another 2 more the make so I guess I'd better get off here and go get them made.


Fancy a snoop around what other artists have on their desks pop on over to the Stamping Ground.

Have a wonderful Wednesday
Anita

16/09/2014

Things That Go Bump In The Night - WIP

I've been playing with a couple of ideas for a trade I signed up for on iATC.  The theme as you can tell by the post title is scary creepy things.  For me it's a challenging theme as it's not something I am asked to make for my clients.  

Here is one that I've started and am quite happy with.  I want to add some spiders and spiders web to add some texture and dimension.  You'd think with Halloween not so far off there would be some bits and bobs in the shops already but I haven't been able to find any.  

I think he turned out pretty well.

Anita