Showing posts with label ink pads. Show all posts

08/10/2014

What's On Your Work Desk? Wednesday #279

Hello, hello and good afternoon on this rather grey but dry Wednesday.  I'm a tad late posting this weeks WOYWW post - want to know more about WOYWW or fancy joining in the fun then pop over the Stamping Ground where all will be revealed.

On my desk today are 2 shop bought cards............yes yes I know but these are so cute.  Well okay I'll let you into a secret I'm not actually going to send them to anyone.  I bought them to use as stencils!!! innovative or what eh?  Want to know where I got them from?  Ahhh heck okay I like to share and I'm nice like that hahaha - Paperchase yep good old Paperchase.  There were a few other designs but I opted for these two (for now) and at £2.50 each you can't grumble.  It's a nice weight so can easily get some good use from them.


Well that's me for today.  I'm going to link this to #blogtoberfest14 for day #8 of blogging - find out more here at Shells in the Bush 

Anita


02/10/2014

Day 2 Of Blogtoberfest14 Confetti/Sweet cones.

Today I have a very simple tutorial to show you using a corner design rubber stamp.  I have used the small Christmas Corner Stamp from Oak House Studio to stamp the design along 3 sides of a piece of rectangular paper with the spring green, dusky pink and sea blue ink pads also from Oak House Studio.  I used a heavier plain white printer paper so it would hold it's shape when twisted into the cone shape.  As you can see from the pictures below its a pretty simple process - stamp and twist.  These are now ready to be filled with sweets or maybe a little treat as a gift for someone special.  Don't forget to pop over the Shells in the Bush to see who else is taking part in  Blogtoberfest14 - 31 days of blogging.


21/09/2014

TAg YoU'rE IT Tutorial- Handmade Monday

Hello everyone hope you've had a wonderful weekend. The weather has been kind to us here in the UK and it stayed dry for the Walk of Hope stroll around Tatton Park yesterday for The Christie Hospital -you can see a pic here

Today I've been playing with some floral stamps from Oak House Studio.  The stamp is part of the Big Christmas collection and is proving to be one of my favourites - there is a positive and negative so great for creating different textures.  All the products I've used in this tutorial are available from Oak House Studio (ribbon and gems are from my stash).

I've made a step by step tutorial if you fancy having a go at making these tags. 

So here goes - 

1.  Gather all your ingredients.  


2. Apply spray inks in your colour choice - I've used citrus orange, totally turquoise and regal claret. Randomly stamp the text with black ink and add ink around the edge of the tag with the sea blue ink pad - just run the ink pad directly onto the edge using a gentle stroke.  Put to one side.


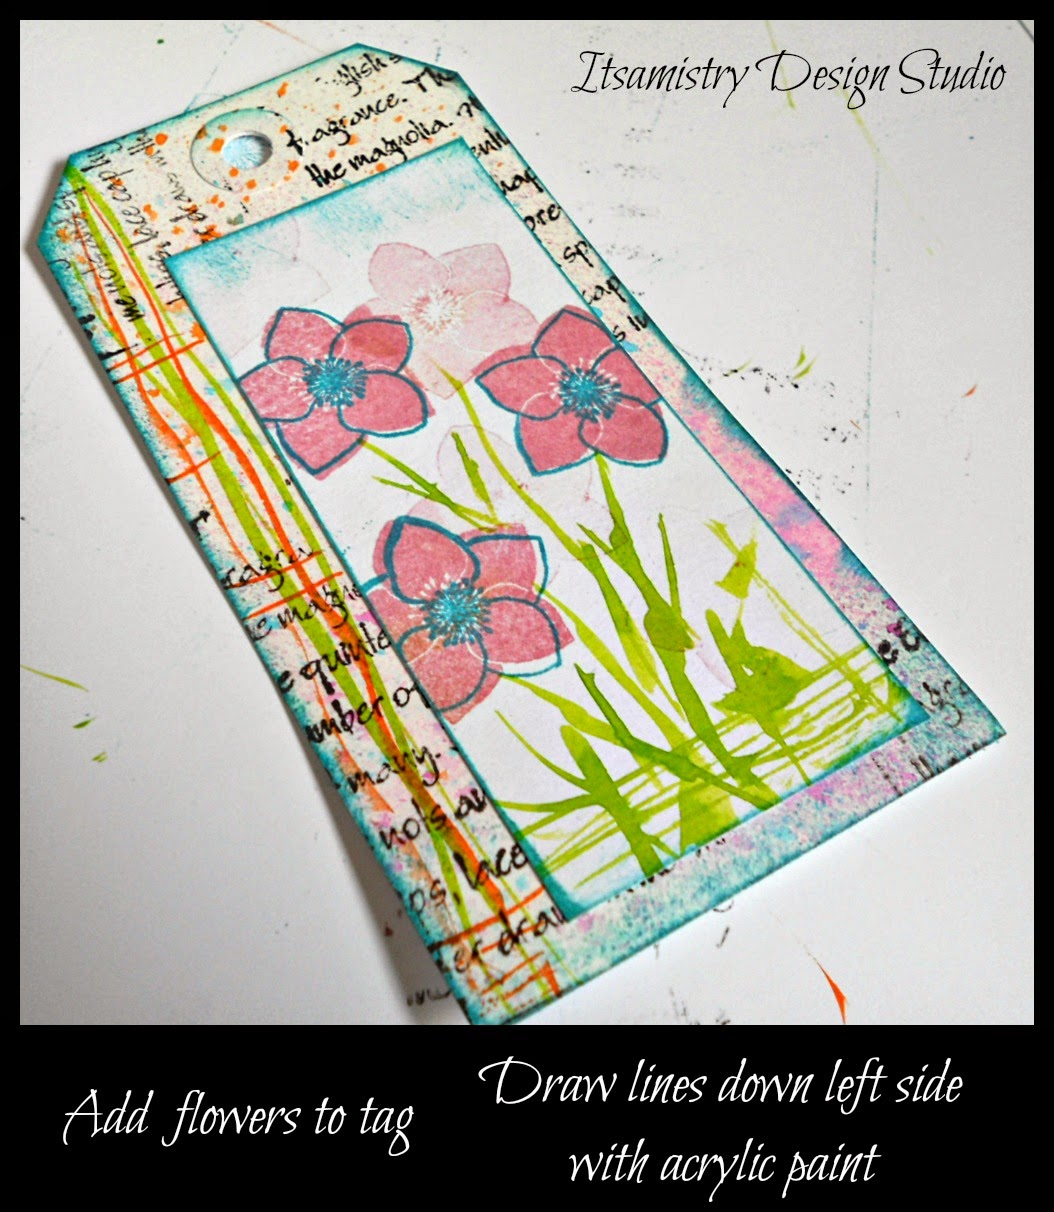
3. Cut a piece of card which is smaller than the tag.  Stamp the solid flower using the dusky pink ink pad and then the outline stamp with the sea blue.  You'll notice that there are a few lighter solid flowers - I stamped these after the initial flowers had been stamped and there is usually a little bit of ink still on the stamp (no point wasting the ink right?).  Add a border again using the sea blue ink pad as in the previous step.


4.  Next we need to add the leaves.  Here I've used the Oak House Studios acrylic inks and a nail art brush (which you can get from Poundland yep you read that right :) )  Dipping the brush lightly and making sure you don't have too much ink on the brush all you need to do is gently stroke the brush in the areas where you want grass/stems and leaves.  You don't have to be too neat to do this.


5.  Glue the smaller stamped card onto the tag (on this one I've glued it off center and to the right.  I've added a few lines of acrylic ink along the left side of the tag using peridot and amber inks with the nail art brush.


6.  I finished off the tags with some ribbon and gems which I added to the middle of the flowers.


Here are a couple of cards I made using the same flower stamp.


I hope you've enjoyed the tutorial - You can find the stamps here
and the ink pads, sprays and acrylic inks here  

I'm linking up with the Handmade Harbour for Handmade Monday and Creatives Mondays 

Happy Crafting
Anita

26/08/2014

Back From My Holiday & Design Team Announcement

Hey lovely peeps I'm back from my holiday in Rochester NYC.  I was there for an art convention with 26 other artist who I know from ATCsforALL.  We had a weekend of making and trading art - although I'm sure there was much more socialising being done than art as most of us had made our art for trading before we arrived in Rochester. 

Now onto the Design Team - before I left for Rochester I applied to Oak House Studio's call out for new Design Team members and while I was on holiday I received an email from Lynnda who owns Oak House Studio to say I had been successful.  Now to keep quiet about it for nearly 3 weeks has been really difficult - but yay now I can shout it out to everyone and I can tell you that you are in for a treat as the stamps and inks are just lovely and I get to play and get creative with them.  So don't forget to subscribe to this blog or get email notifications to keep up to date with what's happening and not to miss out on the tutorials/instructions I'll be posting.

Before I go here are some photo's from the art convention.

Huggles with Sarah 

Outside the Brainery with Cindy, Ann, Sarah and Karen

Collage of the art room and the artists