Showing posts with label cards. Show all posts

01/01/2017

Hello, Hello, Hello Happy 2017

I'd like to start by wishing everyone a very HAPPY and HEALTHY 2017.

I didn't do much blogging in 2016 - I have no excuses only that I didn't have the mojo or inclination to do anything much.  I'm hoping to get back into making and selling my jewellery again this year and make my website live (it's been sitting dormant for the last 12 months).

So I'm going to start today with joining in with the 30 paintings in 30 days challenge which is run by Leslie Saeta every year.  It's really interesting to see what others create.

For Day #1 - ATC mushroom in oil pastels. I thought this challenge would be a good idea to try mediums I don't use but have wanted to have a go at. I bought the Caran d'Ache and Sennelier brands last year but haven't had time to play with them much. This one is done using Sennelier. 


Hope to see you soon.
Anita

23/10/2014

Gelli Print Cards - #blogtoberfest14 day 23

So I've been having fun with the Gelli Arts printing plate and I've now got quite a few pieces of prints.  Now it's great pulling all these prints but what to do with them?  Well the possibilities are endless you can use them as part of your mixed media artwork, or add them to your journal pages, make paper beads with them etc.  Here I've made mine into very simple cards with a little bit of rubber stamping added to them -apart from the first card in the row of 3 which I've doodled on to creating an abstract face and fish.  

I can't take credit for this simple yet effect design.  I was blog hopping last week and I came across Shabby Cottage Studio run by the lovely Gail Schmidt and she has kindly allowed me to use her design idea to create my cards.  Please do pop over and have a look at Gail's blog and her cards as they are really lovely, she's also created matching envelopes how clever is that?


Anita


16/10/2014

Diwali Festival of Lights

#blogtoberfest14  day 16 - This time next week most Hindus all over the world will be celebrating Diwali - The Festival of Lights - I say most as not all Hindus celebrate Diwali as I found out when I was working out there a few years ago and depending on which part of India you are from Diwali is celebrated for different reasons.  

In the Gujarat where my family are from, the festival honours Lakshmi, the goddess of wealth - new businesses are also started at this auspicious time.  Diya's or lamps are lit in every household so that the Goddess Lakshmi will find her way to each house to give her blessings.  Another reason to celebrate is the return of Lord Ram and his wife Sita from an exile of 14 years.  You can read more about Diwali here.  

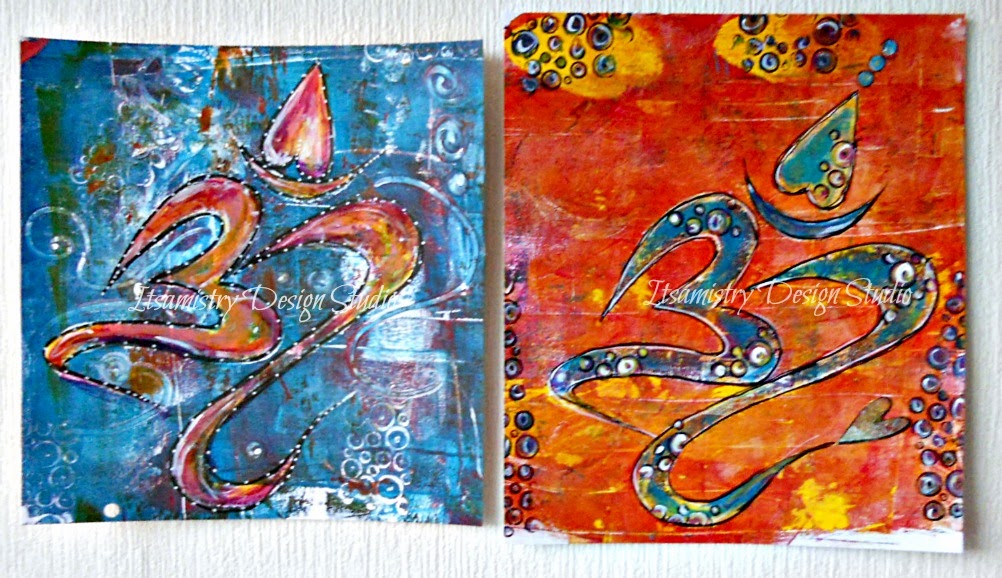
I haven't made any specific cards this year but I think my Gelli print OM designs can be made into cards and are suitable for the occasion.  I know many of the commercial cards depict images of the gods and goddesses and some of my family have mentioned that they would prefer to get something a little bit different.  

These are the original Gelli prints and below are the 2 cards I made by printing onto mat photo paper.


Anita


15/10/2014

What's On Your Work Desk? Wednesday 280

It's time for WOYWW or What's on Your Work Desk Wednesday - find out more about WOYWW on the Stamping Ground blog run by the lovely Julia Dunnit.  

I don't have very much on my desk today other than the remnants of yesterday's card making - some stamped images and off cuts of paper/card, a set of snowflake stamps from Oak House Studio which I used to make the background for the heart with and the embossing along the edge of the gelli print paper.  I'm hoping to make up the off cuts into another card topper.  You can see the card I made yesterday below.  I would have made a couple more cards but I got a bit obsessed with getting the photography correct or attempted to.  

My messy desk

Photograph I took today in natural daylight

yesterdays photograph using lighting

I'm off to peruse as many of the WOYWW desks.
Anita


26/08/2014

Back From My Holiday & Design Team Announcement

Hey lovely peeps I'm back from my holiday in Rochester NYC.  I was there for an art convention with 26 other artist who I know from ATCsforALL.  We had a weekend of making and trading art - although I'm sure there was much more socialising being done than art as most of us had made our art for trading before we arrived in Rochester. 

Now onto the Design Team - before I left for Rochester I applied to Oak House Studio's call out for new Design Team members and while I was on holiday I received an email from Lynnda who owns Oak House Studio to say I had been successful.  Now to keep quiet about it for nearly 3 weeks has been really difficult - but yay now I can shout it out to everyone and I can tell you that you are in for a treat as the stamps and inks are just lovely and I get to play and get creative with them.  So don't forget to subscribe to this blog or get email notifications to keep up to date with what's happening and not to miss out on the tutorials/instructions I'll be posting.

Before I go here are some photo's from the art convention.

Huggles with Sarah 

Outside the Brainery with Cindy, Ann, Sarah and Karen

Collage of the art room and the artists 


07/10/2013

Diwali Cards

Before I can even think of designing/making Christmas cards I have to make Diwali cards to send to friends and family.  In the Gujarat, the festival honours Lakshmi, the goddess of wealth - new businesses are also started at this auspicious time.  Diya's or lamps are lit in every household so that the Goddess Lakshmi will find her way to each house to give her blessings.  Another reason to celebrate is the return of Lord Ram and his wife Sita from an exile of 14 years.  You can read more about Diwali here.  

These are my cards for 2013.  I drew the initial design and then coloured it in with Aquarelle Faber Castell water colour pencils.  Then manipulated them with a software program to create different effects.


This is the original design


These are the 2 images I created with the software

I'm showing these off for Handmade Monday over on the Handmade Harbour blog.  Why not pop over and see what the other crafters have been up to.

Till next time keep crafting.
Anita

21/08/2013

Bathing In Gin While Bowling

Yep that's the name of this digi-stamp - cool isn't it?  My very clever artist friends over on Wonderstrange Arts  create these drawings every week and post it on their blog for you and I to use for free..............yep that's right free :).  If you like quirky and different then this is the place to go. 

I know digi-stamps have been around for some time now but its only in the last couple of weeks that I've actually played with them and I have to say I do like how you can manipulate the designs to become different sizes or reverse images etc.  

Here are 2 cards that I've made with them - 
Very simple card with resized images 

A very quick experiment using printable transparency sheets

 The original image - Bathing in Gin while Bowling

Happy Crafting 
Anita

20/02/2012

Jewellery Party

Last week has been pretty busy as I prepare for a jewellery party this Thursday.   I've made some sparkly earrings with fuchsia pink Swarovski Elements Crystals and a lovely pair with White Opal Crystal Briolettes.


I've also been busy making some more greetings cards which can be adapted to suit any occasion.  I like to let the customer choose the card and message.  Sometimes you can find the card that you like but the message isn't the one that you want.  


I'm pleased to say that the snow has disappeared but it seems to have gone really cold again.   


Here are the earrings


This one is a rubber stamped image which has been painted using Pro-Markers. They are more on the pastel side than my normal brights.  I've stamped the ribbon with a small flower stamp.  I've added glitter and glossy accents to the card to give it some texture.

 This is a single rose stamp.  I have cut out 2 of the images and raised them with foam pads to give a 3D effect.  I made one a few weeks ago with yellow roses.  I thought these would make great Mothers Day cards.

I'd not added the glitter and glossy accents to these when I took the photograph.
If you would like to see more creative work by some very talented artist then pop on over to Wendy's blog at 1stUniqueGifts for her Handmade Monday post.  

I would love to hear your thoughts on my work so please leave a message in the comments box.

Have a great week 
Anita

12/02/2012

CupCake Greetings Card Tutorial

Well here I am again apologising for the lack of posts.  I've not been in the mood to post about anything recently I'm blaming the weather - it's cold, damp and dark and I don't like the cold one little bit.

Anyway, here I am raring to go and post a tutorial on how to make one of my cupcake cards.  The stamps are from Kanban  - called Fairy Cakes (they don't seem to be on the website - I bought mine from Hobby Craft). I made the card to add to my small collection of greetings cards and posted it on the Kanban facebook page.  One of the members asked if I would show how to make the card - which is quite flattering - and because I'm nice and like to share I made up a simple step by step tutorial.  

Here goes - 

Step 1.  Gather your ingredients, Rubber stamps, ink pads, glossy accent, gems, glue, coloured pencils (colouring medium of your choice), smooth water colour paper or card stock and foam pads.

Start by stamping your image onto your card/watercolour paper (300gsm)
   

Step 2 - Paint your images with your chosen medium.  I've used Derwent Inktense watercolour pencils - I added the colour very roughly then blended it all in with a damp (not wet) paintbrush.

Step 3 - Paint your background let dry and then randomly stamp the background.  I've used 2 different flower stamps from the Fairy Cake stamp collection.  If you don't want to create your own background you can use scrap-book or patterned paper instead.
Step 4 - Before glueing the background to the base card add a line along the edge or mount onto contrasting paper.  Once you've glued down the background glue one of the cupcakes to the middle of the card then add foam pads to the remaining cupcakes and place on either side of the centre cake.  

With the glossy accents - add a pea sized drop to the cupcakes and smooth over with your finger to give a glazed look.  While the glue is still tacky add your gems carefully to the cupcake and the bow.

To finish add glitter to the middle of the background flowers and to the edge of the background.

Here is the finished card - 

This is the original card (before it was personalised) - 

A different design from the same collection - this time I've added foam pads to the bows and made them more dimensional.

This one I made for my niece for her 7th birthday.
I'm sharing this as part of Handmade Monday #53 which is hosted by Wendy from 1stUniqueGifts .  If you've enjoyed reading through my tutorial why not pop on over to Wendy's and have a look at what everyone else has been up to.

Before I sign off I must apologise for the added security on the comments - I've had a couple of spam posts which have led to a not so nice website  so until I feel confident that its not going to happen again I'm going to have to leave the moderations on the comments - I know its a pain but I wouldn't want anyone to click onto that site.

Anita