Showing posts with label handmade Monday. Show all posts

03/11/2014

Create Art Everyday November Day 3

I haven't worked on my painting today as I've been busy making and writing up a blog post for Oak House Studio where I'm one of the design team members - this is my last month and the theme is winter.  I can't show you the design until after it's been posted on the Oak House Studio blog.

What I have made today that I can share with you is this little pumpkin guy.  This is an ATC (artist trading card) which will be swapped out as part of a trade.  He is made on water colour paper and is painted with acrylics.  The background is made with a rubber stamp - I've randomly coloured in some of the bubbles with acrylic paint.  He'll be off to a new home tomorrow.


I'm linking up with 
Handmade Harbour for Handmade Monday
Claire Justine for Creative Mondays 

Please do pop over to the above blogs as they have some amazing artists who are willing to share their work in blogger land and beyond.
Anita

19/10/2014

Time For Tea

It's coming up to that time of the year when the masks come off and the broomsticks come out.  Of course I'm talking about Halloween whether you embrace it or not it seems to be getting bigger every year.  I'm all for having a good time..................or should that be a ghoul time hahahaha. 

A member over on one of the artist trading card sites where I'm a member is hosting a trade/swap named "Odd Ball Ornaments".  The aim is to make unusual ornaments which can then be hung on your Christmas tree or around the house............really wherever your heart pleases.  I've had several ideas including altered skeletons, eyeballs etc.  One of them includes altering foam ghoul shapes.  I found some in a local pound shop they are light weight and having a blank canvas to work on is great.

I've used some spray inks, acrylics, stencils, rubber stamps, buttons and one of them even has some watch parts.  

Spray inks and stenciled designs

The one on the left is completed and the other one I need to add some words.

I'm linking up with
 Handmade Harbour for Handmade Monday
Shells In the Bush for Blogtoberfest14
Inky Dinky Doodle for Sunday Sentiment 
Claire Justine for Creative Monday

Do go and visit the above blogs as they have some fantastic artist and blog links.
Anita


12/10/2014

Past Present Future

A small canvas board measuring 5 x 7 inches with my interpretation of the feminine divine.  Painted with acrylics, the words Past Present and Future are from a stencil designed by The Altered Page (available from the Stencilgirl). The clock face and "all the things she never said" are rubber stamps.  It just needs to be sealed with some gel medium - semi mat.  

So that's it from me for today a very short blog post.  I'll be linking up with Handmade Harbour for Handmade Monday, Shells in the Bush for #Blogtoberfest14, Inky Dinky Doodle for Sunday Sentiments and ClaireJustine for Creative Mondays


Anita 


21/09/2014

TAg YoU'rE IT Tutorial- Handmade Monday

Hello everyone hope you've had a wonderful weekend. The weather has been kind to us here in the UK and it stayed dry for the Walk of Hope stroll around Tatton Park yesterday for The Christie Hospital -you can see a pic here

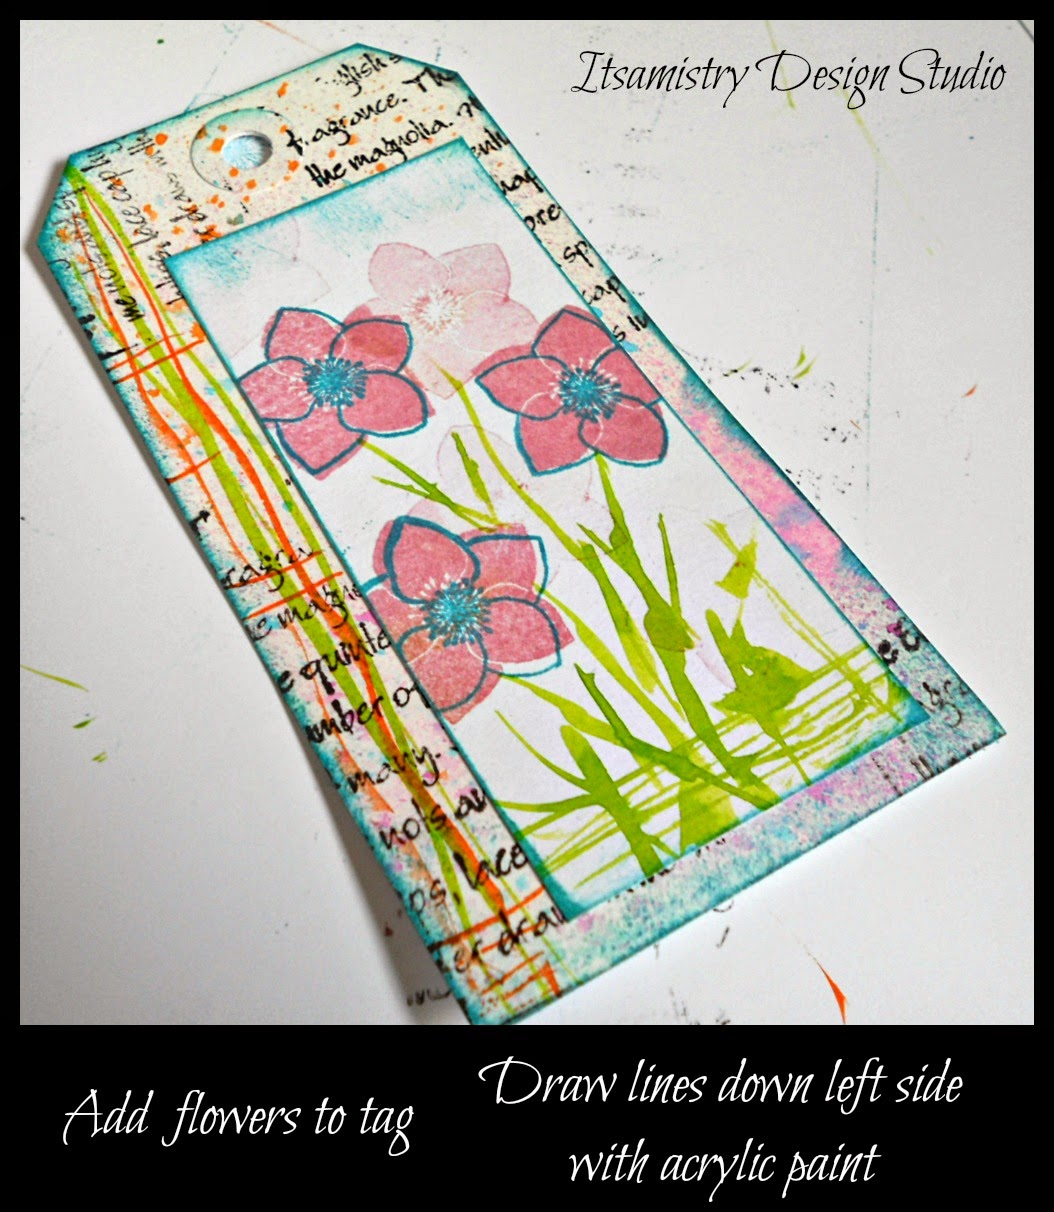
Today I've been playing with some floral stamps from Oak House Studio.  The stamp is part of the Big Christmas collection and is proving to be one of my favourites - there is a positive and negative so great for creating different textures.  All the products I've used in this tutorial are available from Oak House Studio (ribbon and gems are from my stash).

I've made a step by step tutorial if you fancy having a go at making these tags. 

So here goes - 

1.  Gather all your ingredients.  


2. Apply spray inks in your colour choice - I've used citrus orange, totally turquoise and regal claret. Randomly stamp the text with black ink and add ink around the edge of the tag with the sea blue ink pad - just run the ink pad directly onto the edge using a gentle stroke.  Put to one side.


3. Cut a piece of card which is smaller than the tag.  Stamp the solid flower using the dusky pink ink pad and then the outline stamp with the sea blue.  You'll notice that there are a few lighter solid flowers - I stamped these after the initial flowers had been stamped and there is usually a little bit of ink still on the stamp (no point wasting the ink right?).  Add a border again using the sea blue ink pad as in the previous step.


4.  Next we need to add the leaves.  Here I've used the Oak House Studios acrylic inks and a nail art brush (which you can get from Poundland yep you read that right :) )  Dipping the brush lightly and making sure you don't have too much ink on the brush all you need to do is gently stroke the brush in the areas where you want grass/stems and leaves.  You don't have to be too neat to do this.


5.  Glue the smaller stamped card onto the tag (on this one I've glued it off center and to the right.  I've added a few lines of acrylic ink along the left side of the tag using peridot and amber inks with the nail art brush.


6.  I finished off the tags with some ribbon and gems which I added to the middle of the flowers.


Here are a couple of cards I made using the same flower stamp.


I hope you've enjoyed the tutorial - You can find the stamps here
and the ink pads, sprays and acrylic inks here  

I'm linking up with the Handmade Harbour for Handmade Monday and Creatives Mondays 

Happy Crafting
Anita

02/02/2014

Home Is Where The heART Is.

Home is where the heART is.  I'm one of the participants in a travelling journal which will take 12 months to complete - this is the 1st journal which has traveled from the USA.  It's quite a big page slightly bigger than A4 so it was a bit daunting to be faced with a blank page that size.  However once I had an idea of what I wanted to do it developed quite easily.  My favourite are the tubes of paint with the rubber stamped flowers which look like they are growing out of the tubes.  This has given me an idea for some skinny pages I need to make for a swap.  


02/12/2013

Same Elements Different Look & Handmade Monday

It's time for Handmade Monday over on the Handmade Harbour blog.  My post today looks at how you can use the same elements but make each card different and unique.

I don't know about you but I get bored making multiple card that look the same (unless they are for an order).  I also like to give my customers unique cards to buy.  

I made the following using some text paper which I had printed and cut into triangles and mounted onto co-coordinating background paper.  The circles are lengths of quilling paper from my quilling days many moons ago - I have quite a collection.  I like how the tight coils lend themselves to the design of the trees as baubles and tree trunks.


I added a silver snowflake which was cut from a tree garland and the greeting is a rubber stamp from Stampendous.

I made different size coils with the quilling paper and added them in a line to make them look like a tree. 

I've also linked up with the following blogs.

Have a wonderful and creative week.
Anita


11/11/2013

Handmade Monday & Art Every Day Month

Oooopppps I lapsed with the #AEDM the last couple of days but in my defense I have been busy making for Emerge 3Rs Pop Up Shop where I'll be selling some of my handmade cards and jewellery.  I've also been making cards for the Handmade Harbour Design Team so it's all go this week.

Here are some of the cards I've made for Emerge 3R.  The trees and abstract pieces are made from air-dry clay.  The design is made with a rubber stamp painted and with black and silver acrylic paint.


This cute robin has also made his way into the shop.  He's a digi stamp from Handmade Harbour and you can find him here #235 Robin with Stocking.  I like the way you can customise the design to make it look different every time you use it as you can see from the 2 cards above.

Pop over to Handmade Monday  Art Every Day Month and Creative Monday to see what other artists have been making.
Anita

03/11/2013

Art Every Day Month Day 3........Felt Brooches

I missed day 2 of the Art Every Day Month but I do have a good reason why.  I had a post on my facebook page asking if I'd be interested in putting some of my work in a pop up shop in Manchester.  So yesterday I went and had a look and met up with Lisa the lady who runs the shop.  It's lovely and has some beautiful handmade items.  I was so overwhelmed with the lovely comments I received about the sample pieces I'd taken in.  

So now I am busy making up stock for the shop -yep I decided to go ahead and give it a go.  The shop had a steady stream of customers coming in while I was there and when the Christmas market starts in a couple of weeks I can see it getting really busy especially as there is going to be a cafe set up outside and a host of craft huts which will lead from the main market at Albert Square to Spinningfields.

Today's make are some beaded felt flowers.  The flowers are cut with a sizzix die cut and the beads hand sewn into the middle.  I've gone for some pretty bright colours - we all need some colour especially as the days are now cold, damp and grey.  

Don't forget it's also Handmade Monday over on Handmade Harbour blog and Creative Monday. Pop along and see what other crafter's have been up to.


Stay warm and craft
Anita

28/10/2013

Take Flight..........and Let The Adventure Begin

How would you like to be part of a creative adventure and make a difference in the lives of children in Haiti?  Well now you can and all you have to do is make a feather and send it of the Yanik over in Quebec Canada. You can read all about the artist collaboration over on Yanik's blog Avoxtar.  You'll have to be quick though if you're in the UK or Europe as there are only 33 days until the exhibition.  I'll be sending mine today so hopefully it will get there in plenty time (post usually takes approx 2 weeks).

For my feather I used some cardboard and painted it with gesso.  I used a butterfly stencil, rubber stamped words and some glitter.  I used acrylic paint as the main colouring medium.  It measures approx 23cm in length and 6cm at the widest point.  It fits at an angle in a a long DL envelope.  I can't wait to see everyone's feathers.  


Here is my feather - Butterfly Explore Life's Journey

I'm also sharing this as part of Handmade Monday over on Handmade Harbour and Creative Monday 

20/10/2013

Pumpkins and Pumpkins

Mention pumpkins and you conjure up an image of carved out evil looking faces with candles burning inside them.  Well mine is a pumpkin but no candles inside and not carved either.  This is done to ATC size (2.5 x 3.5 inches - ATC = artist trading cards). Firstly I sketched out a rough design then I transfered it onto some calico and painted it with Derwent inktense water colour pencils. For the outline I used a grey/black embroidery thread - 2 strands and back-stitched it all around the pencil lines.  For the eyes I've used yellow sequins and beads down the front.  The edges are bound using button-hole/blanket stitch.

Fabric ATC

This one is the original sketch which I have cleaned up and painted with Polychromo pencils.


Original Sketch

Now head on over to Handmade Monday over at the Handmade Harbour blog and see what the other clever artists have been making.

14/10/2013

Stencils and Texture Paste

A couple of weeks ago I went to the Happy Stampers Festival at PortSunlight - this is a papercrafts/stampers trade/retail show where quite a lot of the well known rubber stamp companies come to sell their products.

One of the things I like about the show is the variety of rubber stamps on offer.  However, it seems the stencil is what everyone is into instead of rubber stamps.  There seemed to be stencils on every stall I visited.  Now I've been using stencils in my work for a number of years now so maybe I've been 'on trend' without realising it.  

As most people know I have an affection for butterflies (and elephants) so I bought myself a couple of stencils in different style.  Today I had a play with one of the stencils a pretty butterfly in 2 different sizes.  The one I used fits neatly on an ATC size card (2.5inch x 3.5inch). For my canvas I've used a medium weight calico for 2 of the butterflies and an ATC size board for the other.  The orange/red butterfly is watered down acrylic paint, I then used some light molding paste from Golden (I didn't have any grunge paste) I got the same effect as the grunge paste.   The black and gold butterfly is on card board - ATC size I used the molding paste on this one to - for some reason the paste isn't as smooth as the one on the fabric but I like the difference between the two.

I'm going to try and embroider the butterflies when I have a free moment.  I think they will look pretty cool.

I'm linking this to the Handmade Monday thread over on Handmade Harbour 
Pop over and see what everyone else has been up to this week.

07/10/2013

Diwali Cards

Before I can even think of designing/making Christmas cards I have to make Diwali cards to send to friends and family.  In the Gujarat, the festival honours Lakshmi, the goddess of wealth - new businesses are also started at this auspicious time.  Diya's or lamps are lit in every household so that the Goddess Lakshmi will find her way to each house to give her blessings.  Another reason to celebrate is the return of Lord Ram and his wife Sita from an exile of 14 years.  You can read more about Diwali here.  

These are my cards for 2013.  I drew the initial design and then coloured it in with Aquarelle Faber Castell water colour pencils.  Then manipulated them with a software program to create different effects.


This is the original design


These are the 2 images I created with the software

I'm showing these off for Handmade Monday over on the Handmade Harbour blog.  Why not pop over and see what the other crafters have been up to.

Till next time keep crafting.
Anita

20/02/2012

Jewellery Party

Last week has been pretty busy as I prepare for a jewellery party this Thursday.   I've made some sparkly earrings with fuchsia pink Swarovski Elements Crystals and a lovely pair with White Opal Crystal Briolettes.


I've also been busy making some more greetings cards which can be adapted to suit any occasion.  I like to let the customer choose the card and message.  Sometimes you can find the card that you like but the message isn't the one that you want.  


I'm pleased to say that the snow has disappeared but it seems to have gone really cold again.   


Here are the earrings


This one is a rubber stamped image which has been painted using Pro-Markers. They are more on the pastel side than my normal brights.  I've stamped the ribbon with a small flower stamp.  I've added glitter and glossy accents to the card to give it some texture.

 This is a single rose stamp.  I have cut out 2 of the images and raised them with foam pads to give a 3D effect.  I made one a few weeks ago with yellow roses.  I thought these would make great Mothers Day cards.

I'd not added the glitter and glossy accents to these when I took the photograph.
If you would like to see more creative work by some very talented artist then pop on over to Wendy's blog at 1stUniqueGifts for her Handmade Monday post.  

I would love to hear your thoughts on my work so please leave a message in the comments box.

Have a great week 
Anita