Showing posts with label glitter. Show all posts

12/07/2015

Summer Of Colour 5 Week 5

This weeks colours are 2 shades of green and 1 pink.  I like this colour combination.  I've kept with the heart theme again but added another of my favourite elements - butterflies.  The heart was cut out of patterned scrapbook paper over which I applied one of the greens and some pink - you can just about see the pattern through the paint.  This was stuck onto the canvas with some gel medium.  The tiny butterflies are made using a punch and the large and medium ones are rubber stamps - I used some gelli print I had from a previous project.  To finish off I added some stickles glitter onto the butterflies.

Find out more about the Summer of Colour 5 over at Twinkle Twinkle Like A Star

18/10/2014

Feminine Divine Commission Artwork

Today I can reveal the commission I've been working on for the last couple of months.  It's been a very enjoyable journey creating this mixed media artwork.  The mediums I've used are acrylic paints, stencils, rubber stamps, glitter and a clay heart I made with air dry clay.


Anita

#Blogtoberfest14 day 18


21/09/2014

TAg YoU'rE IT Tutorial- Handmade Monday

Hello everyone hope you've had a wonderful weekend. The weather has been kind to us here in the UK and it stayed dry for the Walk of Hope stroll around Tatton Park yesterday for The Christie Hospital -you can see a pic here

Today I've been playing with some floral stamps from Oak House Studio.  The stamp is part of the Big Christmas collection and is proving to be one of my favourites - there is a positive and negative so great for creating different textures.  All the products I've used in this tutorial are available from Oak House Studio (ribbon and gems are from my stash).

I've made a step by step tutorial if you fancy having a go at making these tags. 

So here goes - 

1.  Gather all your ingredients.  


2. Apply spray inks in your colour choice - I've used citrus orange, totally turquoise and regal claret. Randomly stamp the text with black ink and add ink around the edge of the tag with the sea blue ink pad - just run the ink pad directly onto the edge using a gentle stroke.  Put to one side.


3. Cut a piece of card which is smaller than the tag.  Stamp the solid flower using the dusky pink ink pad and then the outline stamp with the sea blue.  You'll notice that there are a few lighter solid flowers - I stamped these after the initial flowers had been stamped and there is usually a little bit of ink still on the stamp (no point wasting the ink right?).  Add a border again using the sea blue ink pad as in the previous step.


4.  Next we need to add the leaves.  Here I've used the Oak House Studios acrylic inks and a nail art brush (which you can get from Poundland yep you read that right :) )  Dipping the brush lightly and making sure you don't have too much ink on the brush all you need to do is gently stroke the brush in the areas where you want grass/stems and leaves.  You don't have to be too neat to do this.


5.  Glue the smaller stamped card onto the tag (on this one I've glued it off center and to the right.  I've added a few lines of acrylic ink along the left side of the tag using peridot and amber inks with the nail art brush.


6.  I finished off the tags with some ribbon and gems which I added to the middle of the flowers.


Here are a couple of cards I made using the same flower stamp.


I hope you've enjoyed the tutorial - You can find the stamps here
and the ink pads, sprays and acrylic inks here  

I'm linking up with the Handmade Harbour for Handmade Monday and Creatives Mondays 

Happy Crafting
Anita

02/12/2013

How to make bookmarks or gift tags from scraps of paper


Gather your ingredients - scraps of paper, glue and a sheet of card to stick your scraps onto.  I used an A3 size card you can use A4 which is what most crafters have in their stash of cards.

This is what I call the "eww" stage because it looks like a 5 year old's work.

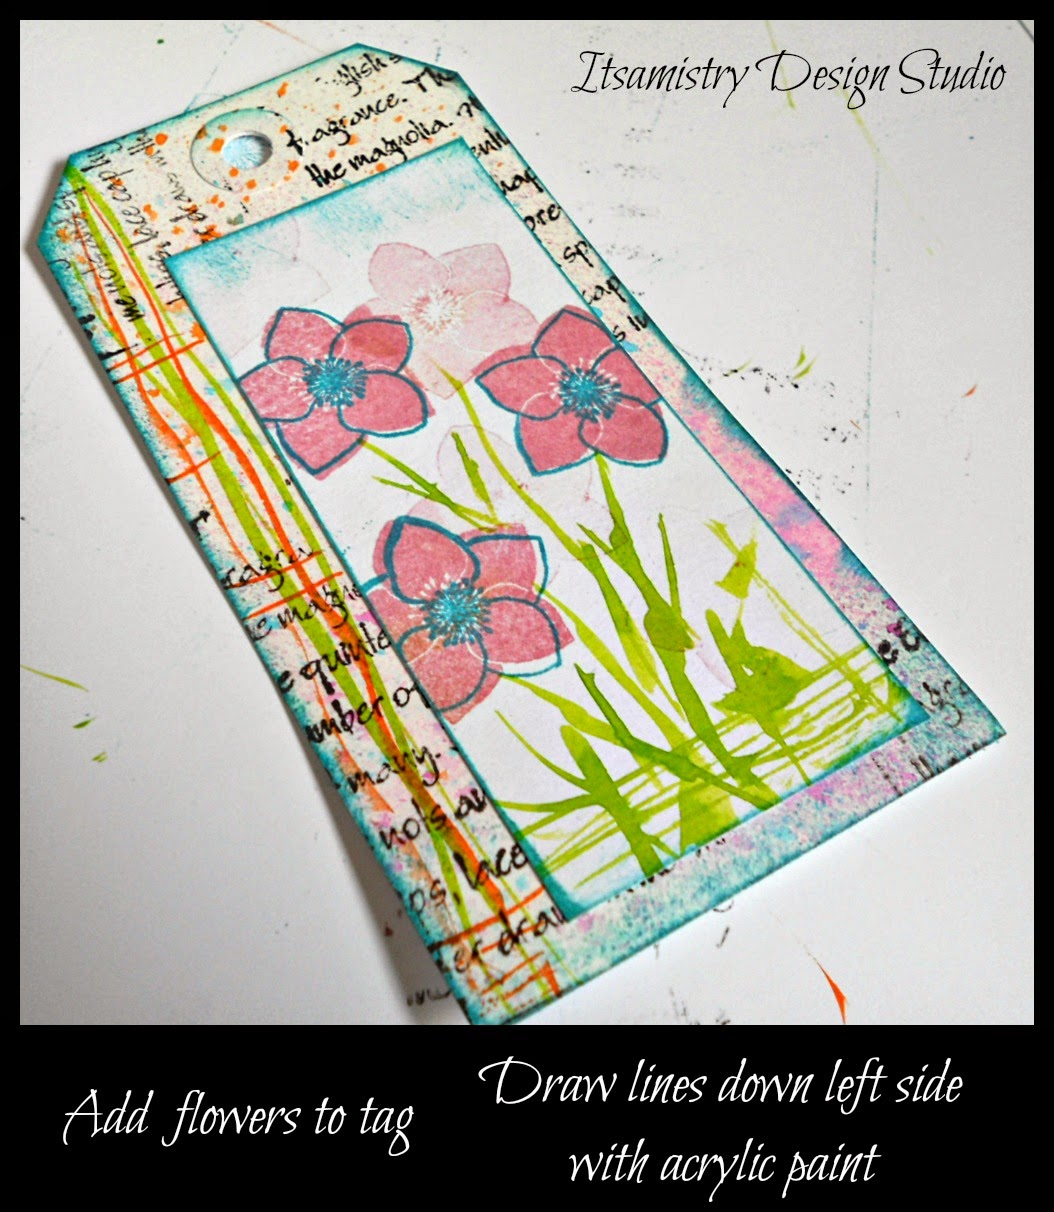
Next start adding paint - I used acrylic paint and added it using a crumpled up piece of bubble wrap - randomly.  You can use anything you like to paint with fingers, crumpled up paper towels, an old credit card etc.  

I then used a stencil with white acrylic paint to sections of the background.

  Over this I added spots of gel medium (with my fingers) and sprinkled some embossing powder (the turquoise bits) into it and heated it with a heat gun - on top of this I did the same again but this time I added some gold embossing powder.  

I also added some fibres which added texture but lost its sheen as I went over it with paint and glue - so you may want to leave it out or add it at the end.


These 2 pictures show a close up of the embossing powder and the texture it creates.  The more I heated it the bubblier it got - just make sure you have a good ventilated room - embossing powder is meant to be used with embossing pads to adhere the embossing powder but I like to experiment and gel medium worked really well (didn't give off any smell but just to err on the side of caution make sure you don't over heat it).

After the background has dried you can cut them to any size you want.  I cut mine to 12cm by 6cm.  I then mounted these onto coordinating card and cut around them so the clean card showed around the edges - you don't have to do this I just think it finishes the tags/bookmarks off and it covers the back of the original background - mine got glue and paint in parts.

Now you don't have to do this stage but I added some embellishments just to make them that more interesting and unique.  I used some odds and ends I've had in my collection box - you can use images out of magazines, text from newspapers in fact anything you like. 

To finish off I punched a hole at the top and added some fibres.

I hope you enjoy the tutorial.
Anita

Same Elements Different Look & Handmade Monday

It's time for Handmade Monday over on the Handmade Harbour blog.  My post today looks at how you can use the same elements but make each card different and unique.

I don't know about you but I get bored making multiple card that look the same (unless they are for an order).  I also like to give my customers unique cards to buy.  

I made the following using some text paper which I had printed and cut into triangles and mounted onto co-coordinating background paper.  The circles are lengths of quilling paper from my quilling days many moons ago - I have quite a collection.  I like how the tight coils lend themselves to the design of the trees as baubles and tree trunks.


I added a silver snowflake which was cut from a tree garland and the greeting is a rubber stamp from Stampendous.

I made different size coils with the quilling paper and added them in a line to make them look like a tree. 

I've also linked up with the following blogs.

Have a wonderful and creative week.
Anita


05/11/2013

Day 5 of #AEDM

Today is a work day so no art has been made.  I had intended to do a quick sketch but it took me an extra half hour to get home so that got put on hold.  However I did receive 2 "faces" in the post - well drawings of faces.  I'm in a round robin type collaboration with 3 other artists who did the 29 Day Face Challenge.  The host of the challenge made up teams of 4-5 depending where in the world you are and each artist starts off a painting/drawing and passes it onto the next artist.  So by the end of of the challenge we should all end up with a face which has been worked on by 4 different artists and their style of drawing/painting.

This is what came today and which I need to add to. Once everyone has got their original pieces back I will do another post showing the whole process.

You can join in the fun with Art Every Day Month or just have a browse through and see what the other artists have to share here 


Have a lovely evening
Anita

04/11/2013

Christmas Card Robin with Stocking .......Day 4 of Art Every Day Month

I'm sharing this lovely little chappy with you today.  He's waiting very patiently for Santa to come and fill up his stocking.  Isn't he cute? 

This is a digi-stamp from Handmade Harbour #235 Robin with Stocking you can find him here.  I've painted him with Polychromo pencils and added some glitter to his hat and the branch.  The parcels and text are done on the computer.  I 3D'd the hat with foam pads to give the card some dimension.

Art Every Day Month Challenge can be found here

Anita

02/09/2013

Witches, Spelling, Potions and CAKE

So this weeks theme for the Handmade Harbour Design Team challenge is "smile or laugh".

As I couldn't decide which stamps to use I asked Wendy to choose a couple for me..........so she sent me over "The Young Witch with Spelling Book", "One Cake A Day" and "Save Water Drink Wine".  3 very different stamps I'm leaving the 'wine' stamp for another day.

I've used the Young Witch and the "Witch or Wizard Potions on a Shelf" for the first card. I made the witch's hat just little bit bigger than my original print out so it looks like she's playing at being a witch.  Then I added the potion bottles to the base of the card,  added some words correct and mis-spelt.  Some punched out silver stars to finish off.  There's a slight gold shimmer to the edge of the card I used some watered down gold acrylic paint.


With this card I used "Witch or Wizard Potions on a Shelf".  The celebration glasses is actually just one rubber stamp that I have stamped twice with black Stazon.  I've added a few 'squiggles' in the glasses to look like earth worms (that was my intention anyway).  The edges of the card has been coloured with inkpads in a direct to paper technique (simply just rubbed the ink pads along the edges until I was happy with the colour.  Over that I have used a slightly darker shade to stamp on some 'bubbles'.  To finish off I've added some glitter to the bubbles coming out of the glasses.


Finally to my 3rd card..........well what can I say I really think this is a 'smile' card.  I LOVE cake, making, baking and eating it so it seemed apt to make this one to.  I've kept this one simple because I wanted the main focus to be the ladies trying to look innocent while eating cake.  On the main picture I've used frosted glitter as the icing on the cake - it's been cut out and mounted onto foam pads to give it some dimension and texture.  I also printed and cut out some smaller cakes but cut out 'chunks' to look as if they had been bitten into.  


You can find all the above stamps over in the Handmade Harbour shop.
If you like to create things with paper then why not join in the fun with the weekly Papercraft Party  and if you use one of Handmade harbours digi stamps in your design you could even win yourself a prize.

I hope you've enjoyed my process into the world of digi-stamps.
Until next time keep crafting and creating.
Anita


08/01/2013

Purple Butterflies

I love butterflies!!!  They are so pretty and delicate.I made this card with two of my favourite rubber stamps.  I have many butterfly stamps but I keep going back to these two.  I've embossed the cluster of butterflies directly onto the base card -you can just about see them.  The tag has the same cluster of butterflies and the larger single butterfly has been stamped, cut out, glittered and wired.


15/07/2012

Balanced Heart Project

I seemed to have lost the will to write any blog posts since March.  I guess sometimes you just have to leave things alone and not get too stressed.  This doesn't mean that I've not been creative.  I have carried on with a couple of art projects and handmade card orders.   

Jewellery making has been put on hold since April/May after an accident at work which caused an inflamed tendon and using any of my tools is very painful.  The ultra-sound hasn't helped so I am now waiting on having a cortisone injection which I am NOT looking forward to as I don't like needles.

Anyway like I said earlier I have been creating artwork and since May I have been involved in a project that has been started by my friend Ang West over on The Balanced Heart Project Every month myself and 4 other artists create 2 pieces of artwork which incorporates "hearts" as the main feature.  The inspiration for this Project, is Ang's little boy, Andrew who passed away on 22nd of October 2001-please pop over to the blog for the full details.  My involvement came about after Ang posted on facebook asking for artist to collaborate in a heart project.  At the time I didn't know what it was about only that "hearts" were involved and as I have a rather lovely collection of "heart Art" I thought this would be a great way of collecting more original artwork.  It was only after hearing Ang's story that I remembered how art and the support from my artist friends had helped me through a very dark time a few years ago and I wanted even more to "help" Ang with her healing.  I am honoured to be part of this project and hope that my "hearts" help her in her journey.


Here are the hearts I sent to Ang for May and June.
 
Hearts for May

Airdry clay hearts for June


These are the hearts I have received from Ang -
 To see all the hearts that have been created for May and June by all the artist involved please pop on over to The Balanced Heart Project blog.  You can also read Ang's full story there.
  

I hope to be back on a regular basis with more updates of the last few months.  


Thank you for visiting and please do leave your comments - they are really appreciated.


Anita